QIDI Q1 Pro 3D Printer: The Ultimate Review for Advanced 3D Printing Enthusiasts
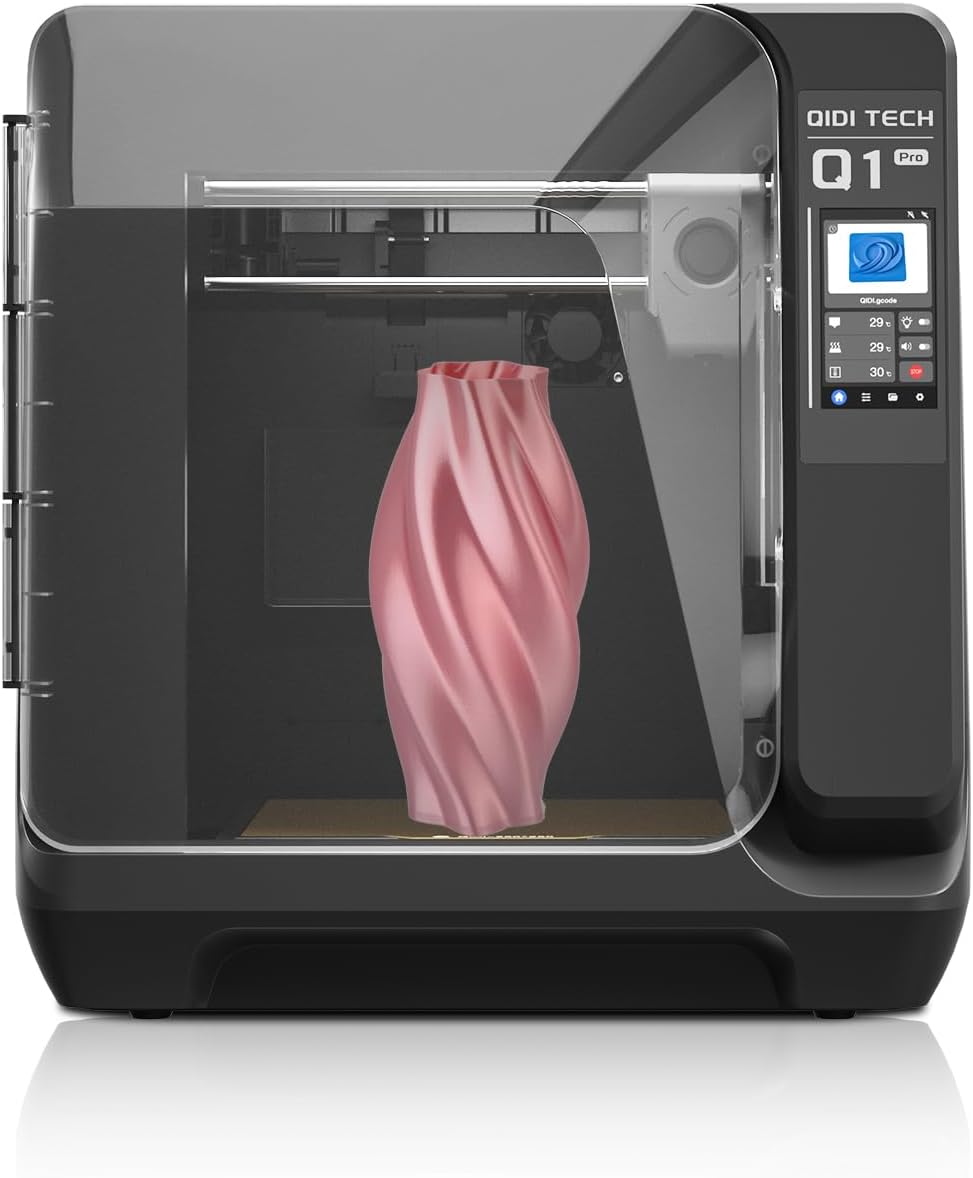
The QIDI Q1 Pro 3D Printer features an actively heated, fully enclosed chamber and CoreXY mechanics for warp-free, high-speed prints, plus a fully automatic leveling system and 350 °C direct extruder for advanced carbon-fiber prototyping.
Interested in the QIDI Q1 Pro?
(As an Amazon Associate, I earn from qualifying purchases, at no extra cost to you. This helps support the blog.)
The QIDI Tech Q1 Pro is a fully enclosed, high-speed FDM 3D printer that brings industrial-grade features (like a heated chamber and Klipper firmware) into a hobbyist-friendly machine.
Overview – Fast, Feature-Packed and Affordable
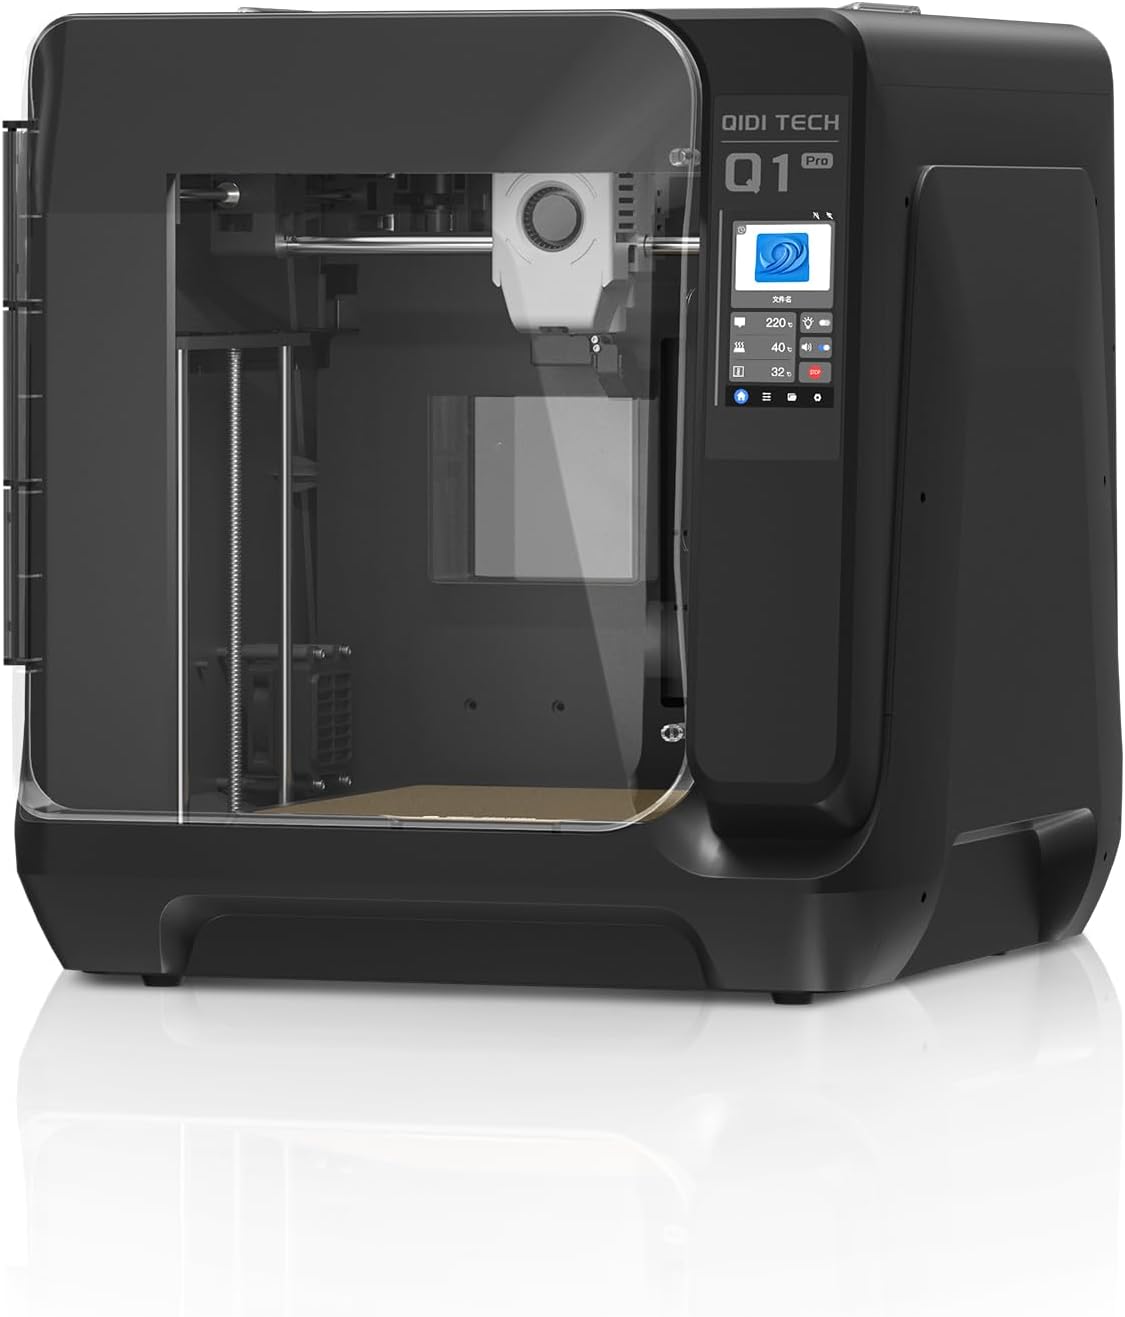
Meet the QIDI Q1 Pro: an ambitious 3D printer promising pro-level performance without the premium price tag. This CoreXY printer comes ready to roll right out of the box – no complex assembly required – and is packed with features that would make even high-end printers blush. With a roomy 245 × 245 × 240 mm build volume (approx. 9.65″×9.65″×9.45″) and lightning-fast motion up to 600 mm/s (20,000 mm/s² acceleration!), the Qidi Q1 Pro aims to dramatically cut your print times. It’s equipped with a 350°C all-metal hotend and a 120°C heated bed, plus an actively heated chamber (up to 60°C) – meaning you can confidently print ABS, Nylon, PAHT and PC filaments that lesser FDM printers struggle with. All this runs on open-source Klipper firmware for smart motion control (input shaping, pressure advance, etc.), delivering precision and repeatability that rivals more expensive machines.
Why all the buzz? Simply put, the Q1 Pro offers capabilities rarely seen in its class. Reviewers have called it “the most budget-friendly actively heated 3D printer money can buy,” noting its internal camera, dual Z-axis, and robust all-metal frame as standout features. In an era of $1000+ speed printers, QIDI’s ~$600 (often on sale for much less) Qidi Q1 Pro is a value-for-money beast that has captured the attention of educators, hobbyists, and professionals alike. It’s positioned as an affordable workhorse that beginners can handle, yet tuned for the high-speed, high-temp demands that advanced users crave.
In this in-depth review and user guide, we’ll dive into the Qidi Q1 Pro’s specs, real-world performance, pros and cons, and who will benefit most from this machine. By the end, you’ll see why this FDM printing prodigy might just be the perfect addition to your 3D printing arsenal. Let’s jump in!
📊 Key Specifications at a Glance
Below is a rundown of the QIDI Q1 Pro’s main technical specs and features:
Active chamber heater; Input shaping; Pressure advance; Internal LED lighting; Resume on power loss (via Klipper)
As you can see, the Q1 Pro’s spec sheet is impressive for its price range. It’s essentially bridging consumer and professional 3D printer features. Next, we’ll break down these specs into real-world benefits and share insights from those who have put the Q1 Pro through its paces.
🔧 Design & Build Quality – Sturdy Enclosed Unit
The QIDI Q1 Pro makes a strong first impression with its premium design and build. The printer comes fully assembled and securely packaged – one user noted it arrived in a huge box with everything neatly foam-packed to prevent shipping damage. Once unboxed, the Q1 Pro’s all-metal frame and enclosure give it a pro-grade look and feel that belies its cost. Gone are the “toaster oven” aesthetics of earlier Qidi models; the Q1 Pro sports a sleek black enclosure with rounded edges and a clear front door – it actually looks high-end.
Footprint: Keep in mind, this is not a compact machine. The sturdy enclosure measures about 477×467×489 mm overall, so it will dominate a desktop. It weighs in around 20 kg (44 lbs), thanks to that solid metal structure. The heft is actually a good thing for stability, but make sure you place it on a robust surface. In fact, when printing at top speeds, the Q1 Pro can produce significant vibrations – one reviewer joked that their flimsy IKEA Lack table “had met its match” once the Q1 Pro started zooming around. The takeaway: use a stable bench or stand to keep the printer steady (and minimize any shimmy from those rapid moves).
Enclosure: The fully enclosed chamber isn’t just about looks – it’s functional. The side panels and top are plastic, helping to trap heat for printing temperature-sensitive plastics. The front features a transparent hinged door for easy access and monitoring prints. Minor gripe: the door’s handle is a bit shallow; a few users found it awkward to grab and ended up adding their own 3D-printed handle mod. Also, the plastic door can static-charge and attract dust or pet hair (if you’ve got cats, expect fur to cling to it!). These are small quirks, but worth noting in an otherwise well-thought-out design.
Build Platform: Inside the chamber, the Q1 Pro has a fully removable spring steel build plate that’s held by magnets on a heated aluminum bed. It’s convenient for popping off prints. However, when that bed gets really hot (100°C+ for ABS) and the chamber is warmed up, one reviewer observed the magnetic grip can weaken – in extreme cases very large prints might make the flex plate bow or pop loose. This hasn’t been a common complaint, but if you plan to max out the build volume with ABS/PC parts, keeping an eye on bed adhesion (or using additional clips) is prudent. For most prints, the magnetic bed works a treat, and the heating is powerful and uniform.
Mechanical Platform: Under the hood, QIDI employs a CoreXY motion system – meaning the X and Y motors move the toolhead in tandem via crossed belts, allowing lighter moving mass for fast motion. The motion components are robust: the Q1 Pro rides on linear guide rails for precision and longevity (a nice upgrade over cheap roller wheels found on budget printers). The dual Z-axis design (two lead screws lifting the bed at left and right) keeps the platform extremely stable and automatically squared. In fact, the machine uses those independent Z motors to perform auto bed tramming: it can probe and adjust the bed tilt itself, ensuring the build plate is perfectly level corner-to-corner before printing. This eliminates the tedious manual leveling many FDM printers require and contributes to better first-layer results.
The QIDI Q1 Pro features a dual motor drive Z-axis that automatically adjusts bed tilt, ensuring better stability and ultra-precise layer alignment—even at high-speed printing.
QIDI Q1 Pro?
If you’re considering purchasing the QIDI Q1 Pro 3D Printer, you can check its current price and availability on Amazon through the link below.
Affiliate Disclosure: Please note that the link below is an affiliate link. This means if you click on the link and make a purchase, I may earn a small commission at no extra cost to you. This commission helps support the blog and allows me to continue creating detailed reviews and helpful content like this. Your support is genuinely appreciated!
Dual Z-axis leadscrews enable automatic bed leveling by leveling the build platform itself (not just meshing). The Q1 Pro’s motors can adjust for any tilt, resulting in a stable, perfectly planar bed surface.
Overall, QIDI nailed the construction – sturdy frame, quality components, and an effective enclosure – hitting well above the typical “consumer 3D printer” standard. A few plastic bits (the spool holder and nozzle wiper) feel a bit cheap/flimsy, but they do their job. The design’s focus is clearly on function and reliability: all-metal where it counts, and enclosed to support the advanced materials this machine is built for.
🚀 Performance Features – Speed, Temperature & Precision
Where the Q1 Pro truly shines is in its performance-oriented features. It’s engineered for speedy printing and high-temperature output – a combination that’s rare in this price class. Let’s break down the key features that impact its performance and print quality:
⚡ Blazing Fast Motion (CoreXY + Klipper)
Speed is the headlining feature of the Q1 Pro. QIDI advertises up to 600 mm/s printhead movement and acceleration of 20,000 mm/s². In practical terms, this means the printer can complete jobs in a fraction of the time that a typical budget FDM printer (often limited to ~100 mm/s) would take. Real-world use shows that while 600 mm/s is mostly a theoretical max for travel moves (you likely won’t extrude plastic effectively at that speed except on very small layers), the Q1 Pro can reliably print at 300–400 mm/s on materials like ABS and PETG without quality issues. One reviewer consistently hit 400 mm/s on PC (Polycarbonate) prints – an impressive feat. Even with PLA, users have cranked it up for fun: the included Benchy boat demo file printed in just 17 minutes (usually a Benchy takes ~1 hour on a standard machine). Those kinds of speeds are eye-popping, turning multi-hour prints into a quick afternoon project.
How does it achieve this? The CoreXY kinematics reduce moving weight, and the Q1 Pro’s frame is rigid enough to handle the forces. More importantly, the printer runs Klipper firmware, which is like having a performance brain tuning every move. Klipper allows for input shaping (to cancel out ringing/vibrations at high speeds) and pressure advance (to maintain extrusion flow during rapid accelerations). The Q1 Pro even guides you through calibrating input shaping during setup – it literally vibrates the machine at different frequencies and finds the optimal settings to keep prints crisp. This results in surprisingly clean output even when pushing the speed limit. Some very minor ringing or surface ripples can occur if belts aren’t perfectly tensioned, but in one case simply tightening the belts and rerunning calibration eliminated those artifacts.
It’s worth noting that the Klipper implementation is somewhat customized by QIDI. They opted for a touchscreen interface that’s different from the stock Klipper (which usually uses a simple text menu). On the Q1 Pro, you do most advanced control through the networked Fluidd web interface on your PC/phone. This provides rich control (macros, live tuning, etc.), but a reviewer or two wished for the more standard KlipperScreen UI as an option. Also, Qidi’s Klipper version is a fork that might lag behind mainline updates For 99% of users this is a non-issue – it works great out of the box – but hardcore tinkerers should be aware you’re somewhat tied to Qidi’s firmware releases (at least unless you hack it). The flip side is that Qidi has tuned the firmware extremely well for the hardware, so you get the benefits of Klipper without needing to be a Klipper expert. The printer’s responsiveness, the smooth motion at insane speeds, and the robust reliability (no skipped steps, etc.) show that this combination of hardware and firmware is dialed in.
🔥 High-Temp Capabilities (Hotend, Bed & Chamber)
If speed is one pillar of the Q1 Pro’s prowess, material capability is the other. Qidi outfitted this machine to handle a wide range of filaments – far beyond just PLA. It’s armed with a 350°C hotend and a 120°C heated bed, which together allow printing of high-temperature thermoplastics. What really sets it apart is the active heated chamber (max ~60°C). This feature is usually found only on industrial or very pricey prosumer printers. By heating the entire build environment, the Q1 Pro dramatically reduces warping and cracking in materials like ABS, ASA, Nylon, and PC. Layers stay warm and fuse better, meaning you can achieve strong, accurate parts in these tough filaments – things that would be a struggle on a typical open-frame printer that cools too fast.
For example, printing ABS on an open printer often results in corners lifting (warping) or layers delaminating. In the Q1 Pro’s heated chamber, users report ABS prints come out near-perfect with minimal warp, as the chamber maintains a toasty environment. One enthusiast even commented that the Q1 Pro handled nylon-carbon fiber filament “no problem” once they dialed in settings, thanks to the 55°C chamber and stable high nozzle temp. This machine is clearly aimed at folks who want to print functional, engineering-grade parts – whether it’s RC car components in polycarbonate, custom jigs in carbon-fiber Nylon, or high-heat-resistant parts in ASA.
Active chamber heating (up to 60 °C) prevents warping and cracking in sensitive plastics. The comparison above shows prints without chamber heat (top, warped/cracked) vs. with chamber heat (bottom, perfectly intact) – a huge advantage for materials like ABS, PC, and Nylon.
The all-metal “Dragon”-style hotend on the Q1 Pro is another highlight. Rated to 350 °C, it handles polycarbonate and nylon filaments easily. It also uses a high-wattage ceramic heater cartridge, so it heats up fast and can maintain high temps during long prints. The nozzle is 0.4 mm by default, but Qidi includes optional nozzles (or you can install your own) in 0.2, 0.6, 0.8 mm sizes to suit fine detail or faster extrusion needs. The extruder is a direct-drive dual-gear unit with a hefty 8.9:1 gear ratio – meaning it can push filament with serious torque. Flexible filaments like TPU feed well in this setup, and abrasive materials (carbon/glass fiber filled) are handled by the hardened steel drive gears and nozzle. Early testers have printed carbon-fiber PETG and glass-fiber polypropylene on the Q1 Pro – materials that usually require specialized machines – with good success. The extruder’s flow rate is specced at 35 mm³/s, which is relatively high, enabling those crazy fast print speeds provided the filament can melt fast enough. In practice, PLA might not melt/flow at 600 mm/s, but materials like ABS and PETG, which stay molten longer, did keep up at 300-400 mm/s with only slight drop in quality.
To keep things running smoothly, the Q1 Pro also features filament runout and jam sensors. If your spool runs empty mid-print or if the filament gets tangled/stuck, the printer will auto-pause and alert you. This is a lifesaver for long prints – you can swap filament and resume without a failed print. It’s a fairly standard feature these days, but Qidi implemented a dual detection (likely one optical sensor for movement and one for presence) to cover all bases, which is a nice touch.
🤖 Ease of Use & Software
For all its advanced tech under the hood, the Q1 Pro strives to remain user-friendly, even for those new to 3D printing. Qidi has clearly tried to make the high-end features as plug-and-play as possible:
Out-of-Box Setup: The printer is marketed as “print within 10 minutes” of unboxing. Indeed, assembly is basically just removing packaging restraints and maybe attaching the spool holder. The color touchscreen then walks you through initial steps: loading filament, running the auto bed leveling routine, and even performing the input shaping calibration. Test prints are preloaded on the included USB drive. Many users (even beginners) report they were up and printing that famous Benchy boat on day one with minimal hassle – which is impressive given the complexity that Klipper could entail. Qidi’s integration of these calibrations into a guided process really lowers the barrier to entry.
Auto Bed Leveling: We mentioned the dual Z auto-tramming. In practice, before each print (if you have it enabled), the Q1 Pro will probe multiple points and adjust the bed plane. One user did find that their bed leveling screws were a bit loose out of the factory, causing a large initial discrepancy – but after tightening and letting the auto system do its thing, they achieved a near-perfect level (within 0.05 mm across the bed). Generally, you won’t need to futz with leveling; the machine handles it, and you can focus on printing.
Touchscreen & Connectivity: The front panel’s touchscreen is a custom Qidi interface that is simple and attractive. You can start prints from USB, tweak temperatures, and see status. Advanced configuration (like editing Klipper macros) isn’t done on the screen – that’s where the WiFi/Ethernet connectivity comes in. The printer runs a built-in computer (a 64-bit ARM processor) that hosts a Fluidd/Moonraker web interface. By typing the printer’s IP address in a browser, you get full control: monitor temperatures, move axes, upload G-code, even watch the print via the 1080p camera feed. The camera feed is handy for remote monitoring – say you’re in another room or even outside, you can check on a long print. It’s not a super fancy camera (no AI failure detection features like some competitors have), but it provides decent video to ensure nothing has gone awry. Setting up time-lapse recording with the camera takes a bit of configuration in the slicer (adding a custom G-code trigger), but once set, you can get cool timelapse videos of your prints automatically.
Slicer Profiles: Qidi includes their custom QIDI Print slicer (based on Cura) with profiles tuned for the Q1 Pro. It covers basics, but as one expert pointed out, some common materials (PETG, TPU, ASA) profiles were oddly missing at launch. You can create your own or import profiles from other slicers, but beginners might wonder why those aren’t preloaded. The good news is the Q1 Pro also works with popular slicers like PrusaSlicer, Cura, and OrcaSlicer – it’s just a matter of selecting a profile or machine settings. The community has already started sharing profiles for dialed-in settings, so you’re not limited to Qidi’s slicer if you have a preferred workflow.
All told, day-to-day operation is straightforward. Once your files are sliced, you can send them via WiFi or stick in a USB drive. The machine boots quickly (like 15-20 seconds). Maintenance is minimal – just keep the print surface clean and occasionally apply grease to the linear rails and lead screws. The nozzle and bed are easy to access for swapping or cleaning. Even though Klipper is a complex system, Qidi has abstracted it enough that you don’t need to touch the command line or know the intricacies to enjoy the benefits. That said, if you are a power user, you can dig into the web interface and tweak to your heart’s content (just remember Qidi’s custom Klipper means you should use their provided config for major changes, or wait for official updates to address any bugs).
🖨️ Print Quality & Real-World Results
Spec sheets and features are great, but how does the Q1 Pro actually print? The consensus so far: it delivers excellent print quality for an FDM machine, especially after a bit of fine-tuning.
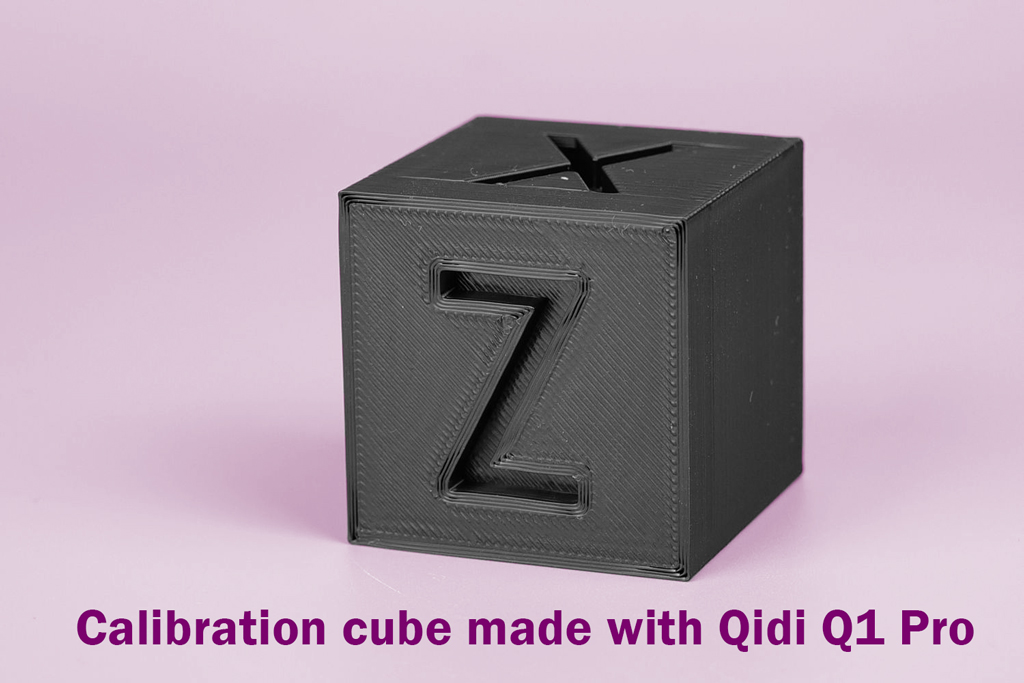
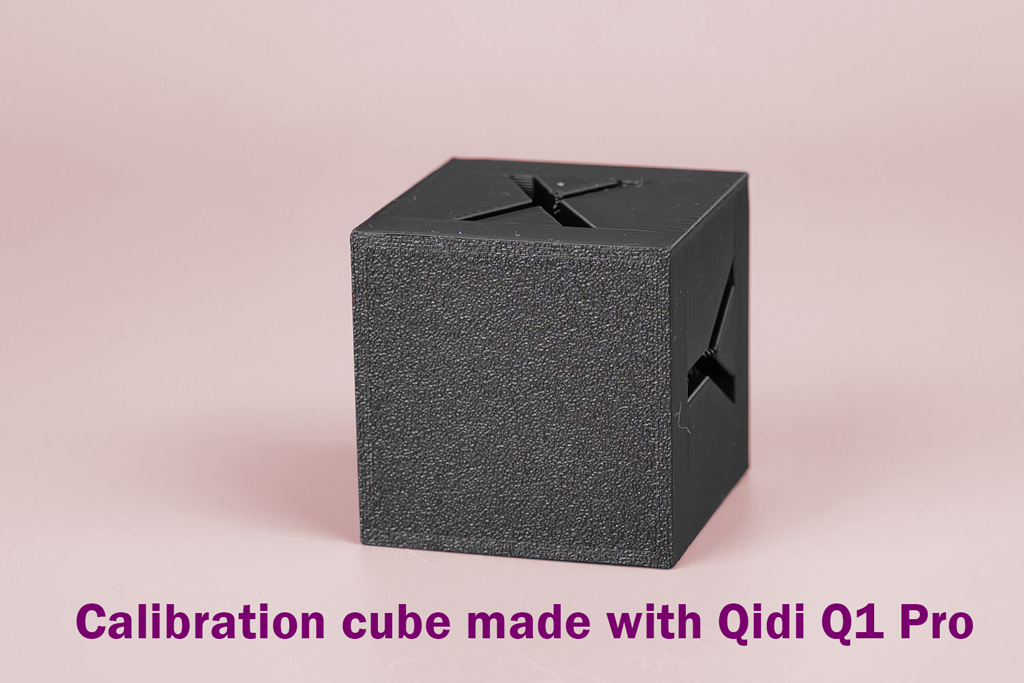
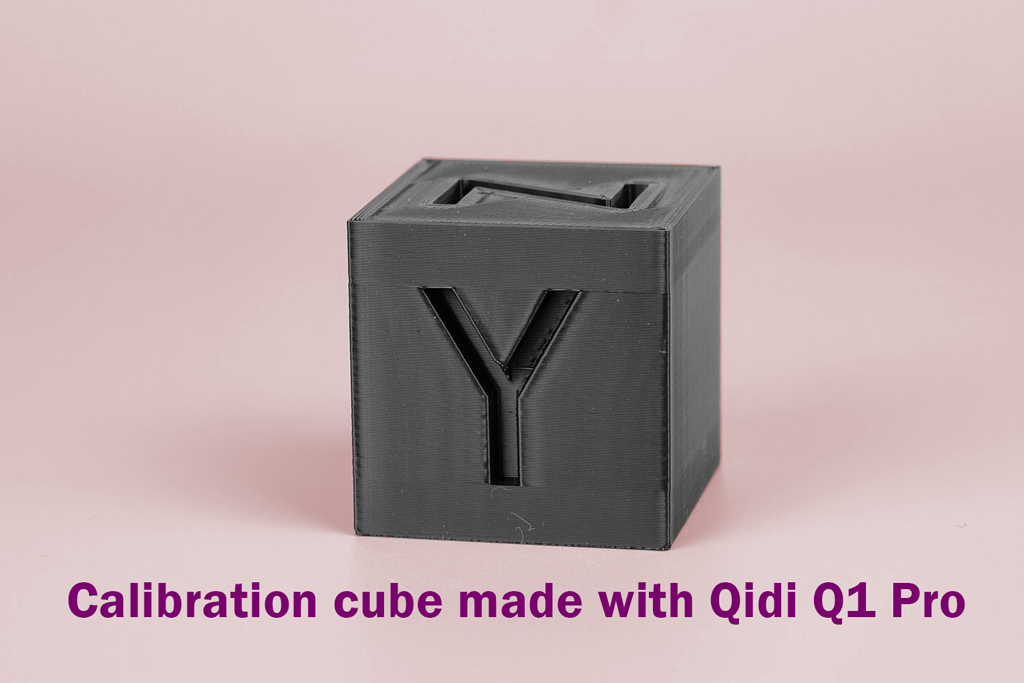
Early test prints like Benchies and calibration pieces show that the Q1 Pro can produce crisp details, smooth walls, and strong parts consistently. At the default “normal” speeds, you’d be hard-pressed to tell the output apart from much more expensive printers – it’s that good. When pushing the envelope at high speed, some minor artifacts can appear (as physics would dictate), but many of those can be mitigated via calibration or simply slowing down a touch on critical layers.
Several reviewers noted the dimensional accuracy is on point – within 0.05–0.1 mm of intended dimensions – which is crucial for engineering prints that need to fit precisely. One tester printed tolerance gauges and found extremely tight tolerances were achievable (after proper belt tension and calibration). The rigid frame and fine-tuned motion control contribute to this precision.
Surface Finish: Thanks to input shaping, ringing (those echo lines next to sharp corners) is vastly reduced compared to a typical machine running at similar speeds. One could observe a tiny amount on extreme speed runs, but it’s minimal. The layers stack neatly; the direct drive extruder handles retractions cleanly, so you don’t get much stringing. A user did see some slight surface inconsistency on a fast Benchy roof which they attributed to maybe pressure advance being tuned a bit high out of the box – but that was an outlier and easily fixed by retuning that parameter. In general, print surfaces come out very clean and consistent, whether in PLA or ABS. The enclosed chamber also means no random breezes cooling a side of your print, which can cause uneven texture on open printers – here, everything stays in a controlled environment, yielding uniform results.
Strength & Layer Bonding: The heated chamber proves its worth in layer adhesion. ABS and Nylon prints from the Q1 Pro show excellent layer bonding (hard to break along layer lines), because each layer is deposited in a warm ambient temperature, so it fuses better with the previous. Compare this to a typical unenclosed printer, where ABS layers cool too fast and can be brittle – the Q1 Pro’s parts are noticeably tougher. For PLA and PETG, which already bond well, the chamber isn’t needed and can be kept off or low. TPU prints benefit from the direct drive extruder for consistent extrusion, yielding solid flexible parts without under-extrusion gaps.
Multi-Material Capability: Users have successfully printed a variety of filaments:
PLA: Prints beautifully at high speed. Just watch for the part cooling needs – PLA likes strong cooling, which the Q1 Pro’s 50×15mm blower fan provides. At very high speeds, there was a note that the side-mounted auxiliary fan can rattle the front door, but moving the machine to a sturdier spot or adjusting the door latch can solve that.
ABS/ASA: With chamber heat, large ABS prints show negligible warping. One large functional print came out near-perfect except a tiny bit of corner lift on a huge flat part (likely due to the magnetic bed issue mentioned) – but medium-sized ABS parts had no warping at all. Layer consistency in ABS was excellent, and even at 300+ mm/s the printer handled it, though quality was optimal around 200 mm/s for ABS in tests.
PETG: Should print easily (though strangely Qidi didn’t include a profile initially). PETG doesn’t necessarily need chamber heat, but the stable environment helps avoid drafts. The direct drive extruder prevents the stringing commonly seen with Bowden setups. Expect strong, glossy PETG prints.
TPU (Flexibles): TPU was tested by some owners and, as expected with a geared direct extruder, it prints well at moderate speeds. With flexible filaments you won’t hit 600 mm/s – more like 60 mm/s – but the Q1 Pro can do it without tangling. The filament path is well-constrained. Just turn off the part cooling fan as needed and you’ll get decent flexible parts.
Nylon (PA) & Blends: Nylon is notoriously tricky (needs high temp, low cooling, no moisture). The Q1 Pro is built for Nylon – 260-280°C nozzle, 60°C chamber, enclosure closed to keep humidity out. Users printed Nylon and Nylon+Carbon Fiber and reported good outcomes. The CF filled nylon especially benefits from the Q1’s capabilities, as it warps less (CF reduces warp too) and the hardened drive gears handle the abrasiveness.
Polycarbonate (PC): PC requires very high nozzle temp (~300°C) and stable high bed temp. The Q1 Pro ticked those boxes and one reviewer frequently printed at 400 mm/s with PC filament, noting the printer “consistently achieved 400mm/s with PC and ABS” after tuning. That’s remarkable – PC usually prints slow due to its high viscosity, so this shows the Q1 Pro’s motion system can take it. The parts were strong and had only minor surface ripple that was later solved by belt tension adjustments.
Exotic filaments: We’ve seen examples of glass fiber polypropylene (a user needed packing tape on the bed to help it stick), as well as PET-CF, PAHT-CF, etc. The machine’s components (nozzle, extruder, chamber) are built to handle these. Just be prepared to experiment with adhesion and slicer settings since these are advanced materials.
In summary, the Q1 Pro lives up to its promise as a versatile performer. It can produce beautiful prints for hobby projects (think cosplay props, figurines, decorative items in PLA), robust functional parts (drone frames in carbon-fiber nylon, automotive clips in ABS, mechanical prototypes in PC), and everything in between. Print quality is on par or better than other printers in its class – and when it’s better, it’s usually because you can leverage that speed or heated chamber to get results those other printers simply cannot do in the same way.
No machine is perfect, however. Let’s candidly go over some of the pros and cons that have emerged for the QIDI Q1 Pro, to give a balanced perspective.
✅ Pros and ❌ Cons
Every 3D printer has its strengths and weaknesses. After researching user feedback, expert reviews, and our own observations, here are the key pros and cons of the QIDI Q1 Pro:
✅ Pros:
Exceptional Value for Features: Offers high-end capabilities (heated chamber, CoreXY, Klipper, etc.) at a fraction of the cost of similarly equipped printers. It punches above its weight in performance vs. price.
High-Speed Printing: Can realistically print 2–4× faster than typical FDM printers while maintaining good quality. Huge time-saver for large projects or batch printing.
High-Temp Material Support: Prints ABS, Nylon, PC, and carbon-fiber composites reliably thanks to 350°C hotend, 120°C bed, and 60°C chamber. Unlocks engineering-grade materials on an affordable machine.
Strong Build & Enclosure: Rigid all-metal frame and dual Z axes contribute to stable, precise printing. Fully enclosed chamber greatly improves print consistency (and safety, containing fumes for ABS).
Fully Automatic Leveling: No manual bed leveling needed – the Q1 Pro auto-calibrates its bed tilt and mesh. This makes life much easier, especially for beginners or when moving the printer.
Klipper Firmware = Smart Printing: Out-of-the-box input shaping and tuned motion means less ringing, accurate dimensions, and the ability to push speeds without quality loss. Advanced users love the customization potential, while casual users benefit from smoother prints by default.
Quick Setup & Easy Use: Arrives assembled and almost ready-to-print. Clear on-screen instructions guide you from unboxing to first print in ~10–30 minutes. A low-hassle experience despite the advanced tech.
Versatile Connectivity & Camera: WiFi/Ethernet connectivity with a nice web interface (Fluidd) for remote control. The built-in camera lets you monitor prints in real-time – great for long jobs. It can produce fun timelapses too (with a bit of slicer setup).
Filament Runout/Jam Sensors: Provides peace of mind for unattended prints – the Q1 Pro will pause if it detects your filament ran out or got stuck. Saves potentially hours of failed print time.
Growing Community & Support: As a newer model, user communities (forums, Reddit, etc.) are actively sharing tips, custom profiles, and mods. QIDI’s customer support is generally well-regarded, and firmware updates have been rolling out to address early issues.
❌ Cons:
Belt Tensioner Design Flaw: The CoreXY belt tensioners aren’t secured at the bottom, allowing slight flex during fast moves. Advanced reviewers found this can introduce minor inaccuracies/ripples in prints. It’s not easily user-fixable (requires a design revision), and a surprising oversight for a “Pro” printer. For most prints it’s subtle, but it’s a hardware quirk to be aware of.
Noisy Fans: When running at full tilt, the Q1 Pro isn’t quiet. High-speed printing means the steppers hum, and multiple fans (hotend, chamber heater, electronics cooling) generate a fair bit of noise. Some reported the side fan causing the front door to rattle at certain speeds. Don’t expect silent operation – it’s comparable to a typical enclosed printer (the chamber does muffle some sound, though).
Front Door & Spool Holder Issues: The front door lacks a well-protruding handle, making it a bit tricky to open (a minor annoyance – fixable with a printed handle add-on). Also, the top-mounted spool holder is functional but feels cheap; one user worried it could break with a heavy filament spool. These are small quality gripes rather than functional problems.
Magnetic Bed Adhesion at High Temp: As noted, the magnetic flex plate can lose some grip when the chamber and bed are at max temps. This could lead to the plate shifting on very large ABS/PC prints. Using binder clips or printing with the chamber slightly cooler can mitigate this. For most moderate prints, the magnetic base is fine.
Qidi’s Klipper = Limited Updates: The Klipper firmware is customized and a bit “locked down.” You can’t easily install the latest vanilla Klipper features; you rely on Qidi for firmware updates. To their credit, Qidi has actively updated the firmware, but some advanced users feel a little constrained compared to a self-built Klipper setup.
Slicer Profile Gaps: At launch, the provided slicer profiles for Qidi Print were incomplete for certain common filaments (no default for PETG/TPU, etc.). Beginners might be confused by this and have to manually create profiles. This is a software nitpick and will likely improve over time (or you can download community-made profiles).
Size & Weight: This isn’t really a flaw, but remember the Q1 Pro is large and heavy. If space is at a premium or you need a portable unit to lug to a classroom, it might be cumbersome. It’s also overkill if you only ever print PLA miniatures – you’d be paying for features you might not use.
It might look like a long list of cons, but keep in mind many are minor issues or edge cases that don’t affect everyday printing for the average user. QIDI took some bold steps with the Q1 Pro’s design, and while they nailed most of it, a few rough edges remain (some literally, if we count that door handle!). The good news is that there are no show-stopper problems – most owners are very happy with the machine’s performance and consider the drawbacks to be fairly trivial compared to everything you’re getting.
Next, let’s discuss who the QIDI Q1 Pro is best suited for, and whether it aligns with your needs and use cases.
🙋♂️ Who Should Buy the QIDI Q1 Pro?
Is the Q1 Pro the right printer for you? This question really comes down to what you plan to do with it and your experience level. The Q1 Pro is a versatile machine, but it especially shines for certain users:
Hobbyists & Makers Wanting an Upgrade: If you’re a hobbyist who started with an entry-level printer (like an Ender 3 or similar) and you’re craving more – more speed, more material options, more reliability – the Q1 Pro is a fantastic upgrade. It takes what you’re used to and supercharges it. You’ll spend less time tweaking and more time actually printing cool stuff. Plus, you won’t outgrow it quickly; as your skills advance, the Q1 Pro has the headroom (Klipper tuning, exotic filaments, etc.) to keep up with your experimentation. It’s for the maker who’s ready to level up without spending a fortune on a “big name” high-speed printer.
Props/Cosplay and Designers: Need to pump out large cosplay armor pieces or prototype product designs under tight deadlines? The high-speed, large-volume nature of the Q1 Pro is your friend. It can handle big PLA or PETG prints for props, or do detail pieces in ABS that you can sand and finish. The enclosed chamber also means you can use materials that post-process nicely (ABS for acetone smoothing, for instance). If you’re used to multi-day print jobs, the Q1 Pro can turn those into single-day jobs without sacrificing quality, which is a game changer for productivity.
Engineering, Functional Parts & Small Business: For folks printing functional parts (drones, RC cars, mechanical prototypes, jigs and fixtures, replacement parts), this printer is aimed at you. It’s one of the most affordable ways to reliably print strong materials like Nylon and PC that you might need for durability. The print accuracy and consistency make it suitable for prototyping pieces that need to fit or have moving assemblies. If you’re a small business or product developer who can’t justify a $3000 industrial machine, the Q1 Pro lets you get quasi-industrial performance on a budget. It’s also showing promise as a print farm unit – its reliability and speed mean you could run multiple Q1 Pros to churn out parts in volume for Etsy orders or local businesses.
Educators and 3D Printing Labs: This might not be immediately obvious, but the Q1 Pro can be a great addition to a school or makerspace. The fully enclosed design adds a layer of safety (no hot extruder exposed for curious fingers, and it contains any ABS fumes). The auto-leveling and guided setup reduce the learning curve for students. And its ability to do quick prints means a class can actually finish prints during a lab period. The only caution is the machine’s complexity – while it’s easy to operate basically, an educator should be somewhat familiar with advanced printing concepts to utilize it best. But as a way to expose students to state-of-the-art consumer 3D printing (CoreXY, Klipper, etc.) without a stratospheric cost, the Q1 Pro is very compelling. Just make sure you have a solid table for it in the classroom and maybe stick to PLA/PETG in shared spaces to avoid any ABS smell (or vent the enclosure).
Beginner with Ambition: What if you’re brand new to 3D printing? Is the Q1 Pro a good first printer? It can be, if you’re tech-savvy or the type who wants to jump into the deep end. The machine is quite forgiving for a beginner – assembly is easy, and bed leveling is taken care of. You’ll be able to get successful prints early on, which is encouraging. On the flip side, the Q1 Pro has a lot of bells and whistles which might be overwhelming if all you want is to casually print a few miniatures. A true newbie might not utilize half of its features initially. However, if you’re the kind of beginner who likes to buy something “for the long haul” so you won’t need to upgrade for years, the Q1 Pro fits that philosophy. You can grow into its advanced capabilities over time. Many first-timers have navigated it just fine, thanks to Qidi’s user-friendly approach, but be prepared to learn a bit more beyond the basics to really make the most of it. The community and documentation will be your friend in that journey.
Those Who Demand Speed & Volume: Lastly, if your primary need is speed – you’re printing farm plates of parts or you’re just impatient (aren’t we all sometimes?) – the Q1 Pro is one of the few machines in the budget realm that targets high-speed printing. Likewise, if you need an enclosed build volume in the ~250 mm range, your choices are limited (and usually much pricier). The Q1 Pro stands almost alone in offering a heated, enclosed 250×250 mm build area at this price. So if your projects specifically require an enclosure of this size (for example, printing large ABS prototypes or functional assemblies in one go), this printer was practically made for that scenario.
On the other hand, who might not need the Q1 Pro? If you only print PLA and value silent operation and simplicity above all, a simpler open-frame printer might suffice. The Q1 Pro is overkill for someone who never intends to go beyond basic materials or moderate speeds. Also, if you’re constrained on space or need a lightweight portable machine, the bulky Q1 Pro won’t be ideal. But for most enthusiasts and professionals looking in the ~$400–600 range, the Q1 Pro’s broad capability makes it an attractive all-rounder with a specialty in speed and advanced materials.
QIDI Q1 Pro – Powerful, Enclosed 3D Printer Built for Speed and Precision This advanced FDM printer offers a 350°C direct drive extruder, 60°C heated chamber, and automatic leveling—perfect for high-temperature and warp-prone materials like ABS, PA, and carbon fiber blends.
QIDI Q1 Pro?
If you’re considering purchasing the QIDI Q1 Pro 3D Printer, you can check its current price and availability on Amazon through the link below.
Affiliate Disclosure: Please note that the link below is an affiliate link. This means if you click on the link and make a purchase, I may earn a small commission at no extra cost to you. This commission helps support the blog and allows me to continue creating detailed reviews and helpful content like this. Your support is genuinely appreciated!