


Print On Air: FDM 3D Printing
The market share of Fused Deposition Modeling (FDM), the most common and accessible 3D printing technology, continues to grow due to its broad range of applications and the diversity of printable materials. As a material extrusion technology, FDM 3D printing works by melting polymer materials and extruding them through a nozzle to build objects layer by layer.
If we discuss the printing process of an object printed with this technique, it consists of the following stages:
1. Modeling and Slicing:
This process involves designing the object in a CAD environment and slicing it using special software. If necessary, support structures are also added at this stage. In summary, the entire path that the print head will follow to create the object is planned in this step.
2. Printing Process:
At this stage, the 3D printer prepares and starts printing. Once the material reaches the required melting temperature, the printing begins, and the object starts forming. If support structures were added during the slicing process, they are also printed using a weaker and more easily removable material.
3. Post-Processing:
After FDM printing, additional post-processing steps may be required to achieve a smoother and higher-quality surface finish. At this stage, the support structures added during printing must also be removed.
When Are 3D Printing Support Structures Necessary?
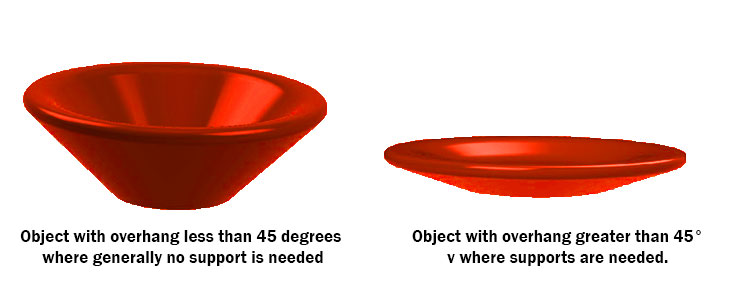
In standard FDM printing, support structures are generally not required for overhangs with an angle of 45 degrees or less. During the slicing process, these angles are taken into account while planning the print. As inclined sections are printed, each layer is placed partially on top of the previous layer, allowing the molten material to bond strongly between layers.
However, for parts with overhangs greater than 45 degrees, support structures are necessary when using standard printing techniques.
Below, you can see an illustration comparing an object with a 45-degree angle that does not require support and an object with an overhang greater than 45 degrees that requires support.
Support Structures in 3D Printing
Support structures are generally divided into two types:
- Mechanically removable support structures, which can be removed manually.
- Soluble support structures, which require a chemical solution for removal.
Although support structures are beneficial, they are often considered undesirable due to factors such as material waste, the need for additional post-processing, and difficulties in removing supports from hard-to-reach areas of the object. Therefore, while support structures can be useful, if there is a way to print without supports, that method should be preferred first.
Is It Possible to Print Without Supports?
There are several methods for printing without supports. However, this article focuses on a simpler technique that has been the subject of scientific research. This method involves adding a vacuum-filled material to the areas that require support during printing, allowing the layers to bond effectively. The filling ratio of this material varies between 30% and 80%.
Let’s break down this printing technique into steps for a more detailed understanding.
When an Overhang Requiring Support is Formed:
Step 1:
- The cross-section of the layer just before the overhang is determined.
- This cross-section is named sectA, and its position is calculated using the formula:
Z1 = Z0 – HLayer
(HLayer represents the thinnest layer height that the printer can deposit. Z0 is the printing height at which the overhang begins, and Z1 is the height of the layer just before the overhang.) - The cross-section at the level of the overhang is calculated and named sectB.
- The difference between sectA and sectB is determined to obtain sectC, which defines the boundary of the overhang.
Step 2:
- Based on sectA, a series of offset polygon patterns is generated to create the overhanging regions.
- This offset process is carried out in increments smaller than the extrusion width and continues until the object’s boundary is reached.
- These offset steps occur at a micron level and are adjusted to ensure that each newly deposited layer properly rests on the previous layer.
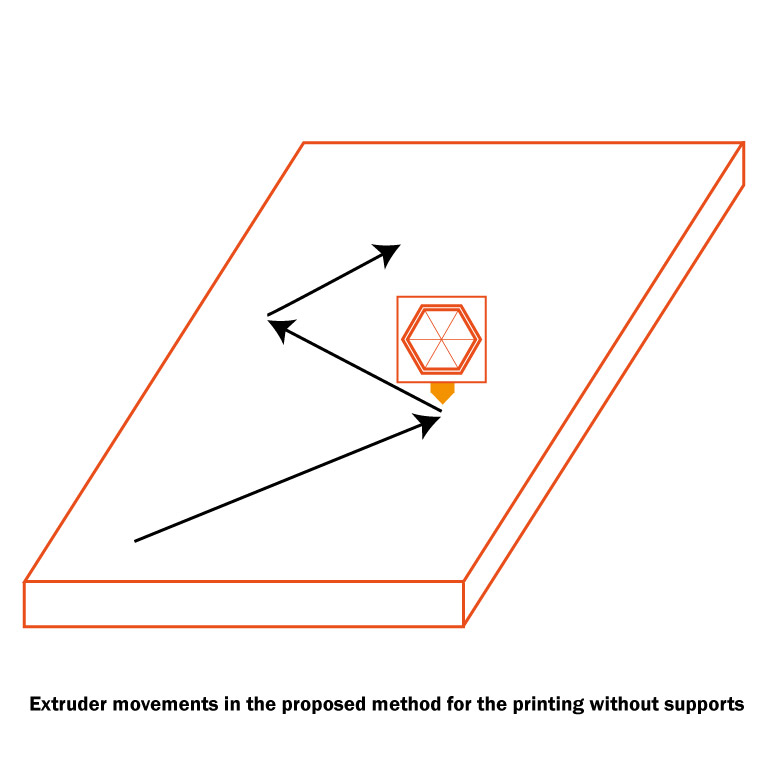
Step 3:
- While the print head is extruding material for the overhang, localized cooling is applied using fans to ensure the material solidifies instantly.
- In the final stage, the infill of the overhanging region is completed. The intersecting polygon lines between sectB and listOffsetSezA are calculated. These lines determine the paths that will form the overhang region.
(listOffsetSezA refers to the set of offset polygons used by the algorithm to create the overhang region without supports.) - The extruder moves along these predetermined paths, successfully forming the overhang.
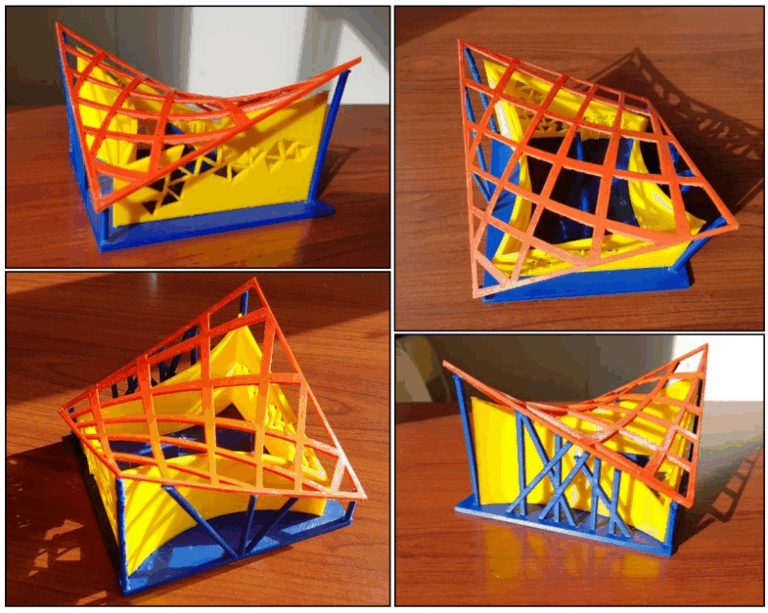
Below, you can see test objects with 90-degree overhangs printed using this method.
References
Wei , S. Qiu, L. Zhu, R. Feng, Y. Tian, J. Xi, Y. Zheng, “Toward Support-Free 3D Printing: A Skeletal Approach for Partitioning Models”, Ieee Transactions on visualization and computer graphics, vol. 24, no. 10, october 2018.
Fazzini, G., Chiulli, D., Muttillo, M., Paolini, P., Barile, G., Pantoli, L., Paolucci, R., Leoni, A., & Ferri, G. (2019). Print on air: FDM 3D printing without supports. IEEE. https://doi.org/10.1109/XYZ.2019.123456