

Pre-Print Settings for Home 3D Printers: From Basics to Pro
For home 3D printers, getting the most out of your machine starts with the right pre-print settings. One crucial step is converting your digital model into commands that the printer can understand—that’s the slicing process and the creation of G-Codes. This operation, carried out by what we call 3D printing software, is a key part of setting up your print. With popular slicing programs like Ultimaker Cura, Slic3r, and PrusaSlicer, the printer’s model is broken down into parts, which helps optimize the FDM 3D printing process.
These programs aren’t just for open-source 3D printers; you can also use them with your professional machines. In fact, many modern 3D printer manufacturers even offer their own slicing software options.
Choosing the Right 3D Slicing Software
When it comes to picking the best slicing software, keep a few criteria in mind—ease of use, supported printer models, and optimization features are all important. Here are some standout features of the programs mentioned above:
• Ultimaker Cura: This open-source slicing software is renowned for its excellent user support. Originally launched as Cura, it was later rebranded to Ultimaker Cura after gaining further development and backing from Ultimaker.
Ultimaker Cura, with its sleek, modern interface, is a total breeze for beginners while still packing over 400 customizable settings for the seasoned user. One key pre-print option is the layer preview—this nifty feature lets you inspect your sliced object layer by layer, ensuring that even the most intricate details print safely. And here’s the kicker: Ultimaker Cura supports nearly every FDM 3D printer out there, boasting a library filled with models from a multitude of popular brands. Whether you simply download the app and pick your printer or go the extra mile and create a custom 3D printer profile, you get all these benefits completely free.

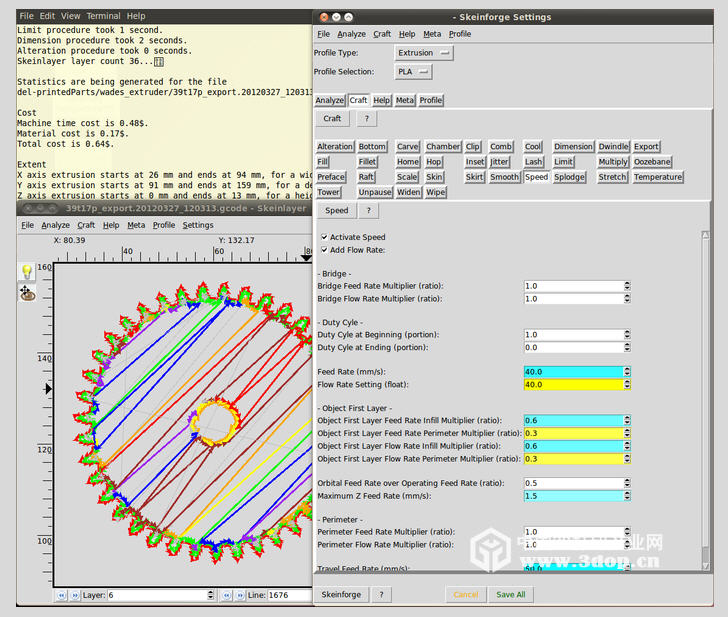
• Skeinforge is a modular slicing tool built using the Python programming language. Its user interface might come off as rather rudimentary and a bit complex—after all, Skeinforge wasn’t designed to be immediately user-friendly. In fact, it’s pretty common to fire it up through other interface applications rather than running it as a standalone program.
At the outset, you’ll need to set up your user profile and fine-tune your settings in an incredibly comprehensive and detail-oriented way. But here’s the silver lining: this meticulous setup pays off by delivering a vastly improved and highly optimized 3D printing experience.
• Slic3r: Thanks to its extensive user guides, Slic3r is a popular choice that’s especially friendly for beginners. Compared to other software, the user interface comes off as straightforward and a bit traditional. One of its main perks is that it’s open source—letting developers and makers tinker with it as they please. Even so, I must point out that it doesn’t quite have the modern vibe you see in today’s alternatives. Sure, its support and updates might trail behind its competitors, but you can still integrate it into any FDM printer and tweak the settings with complete peace of mind.
During the configuration process, Slic3r software also throws in a variety of G-Code flavor options. In simple terms, a G-Code flavor is a setting that formats the G-code commands produced by slicers like Slic3r so that your device’s firmware—whether it’s for a 3D printer or a CNC machine—can understand them. The available choices include RepRap (Marlin/Sprinter), Repetier, Teacup, MakerWare (MakerBot), SailFish (MakerBot), and Mach3/LinuxCNC.
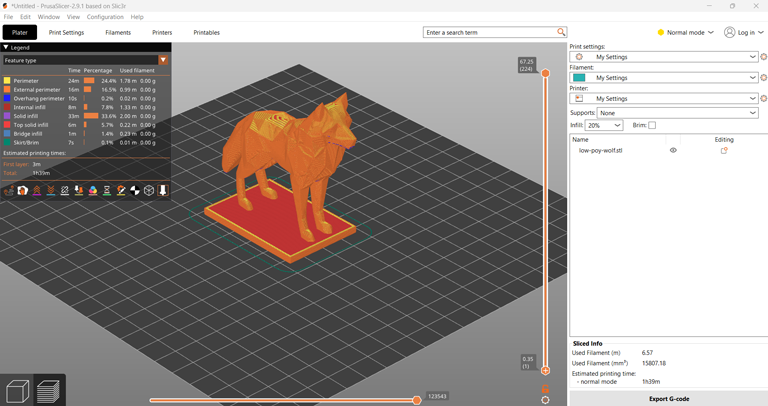
• PrusaSlicer:
PrusaSlicer is the evolved version of the Slic3r project—refined and pushed forward by Josef Prusa’s team. It started off as “Slic3r Prusa Edition (PE)” but was later rebranded as PrusaSlicer.
While it comes bundled with profiles that work perfectly with the popular printers from Prusa Research, it also offers a slew of ready-made profiles for many other 3D printer brands. You can easily set it up with your very own homemade 3D printer, no hassle at all. Thanks to its user-friendly interface and straightforward operation, you can fine-tune your prints down to the smallest detail. It packs a lot of advantages over other software, and the standout feature has got to be its advanced setting that allows for variable layer height adjustments. With regular updates, it really makes sure your user experience is top-notch.
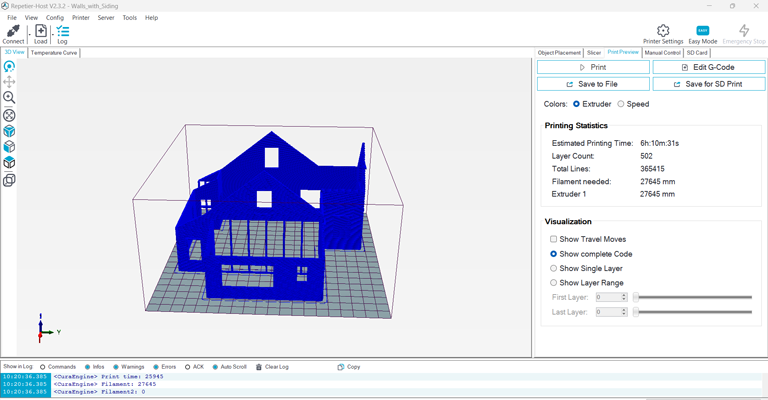
• Repeiter-Host: Repeiter-Host is a popular slicing and control software, and I’ve got to say, I highly recommend it—especially since I used it with the very first home 3D printer I built. It effortlessly integrates with virtually any 3D printer. Beyond slicing, it also lets you control and test your printer, making it a real all-rounder.
And here’s another neat feature: within the same software window, you can switch to a manual control mode. This mode gives you the power to monitor your printer’s extruder, axes, and even its bed temperature and settings. You can start and stop your print manually—talk about being in complete control! Plus, it comes loaded with several slicer engines (Slic3r, Cura engine, Skeinforge, and PrusaSlicer), so you can choose the one that best fits your workflow.
Pre-Print Settings and Optimization for 3D Printing
Before you even hit that “start” button, you’ve got a whole array of settings to consider—literally hundreds of them. These tweaks are directly related to how intricate your 3D model is and what special demands your project might have. If you’re working on a super-detailed, heavily contoured model or something that needs to survive under demanding conditions, you’ll want to focus on fine-tuning these options during the G-Code generation process to secure the best outcome.
In this extensive guide, we’ll discuss both fundamental parameters and evaluation criteria, as well as advanced optimization steps that come into play when you need that extra push in precision. Keep this in mind whether you’re printing the simplest model or tackling something that’s quite a handful: The more optimization you put in, the better your final result.
Basic Print Settings and Parameters
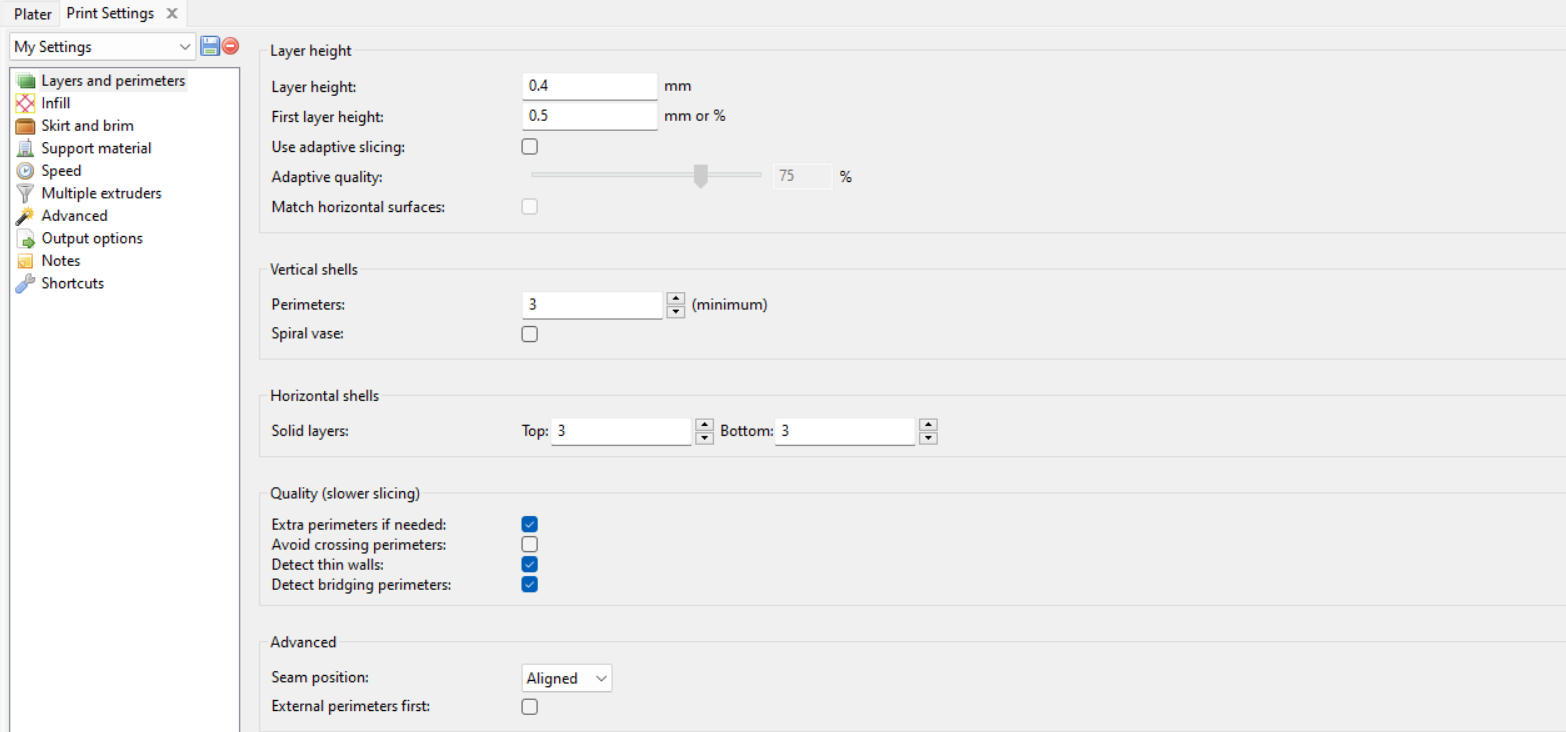
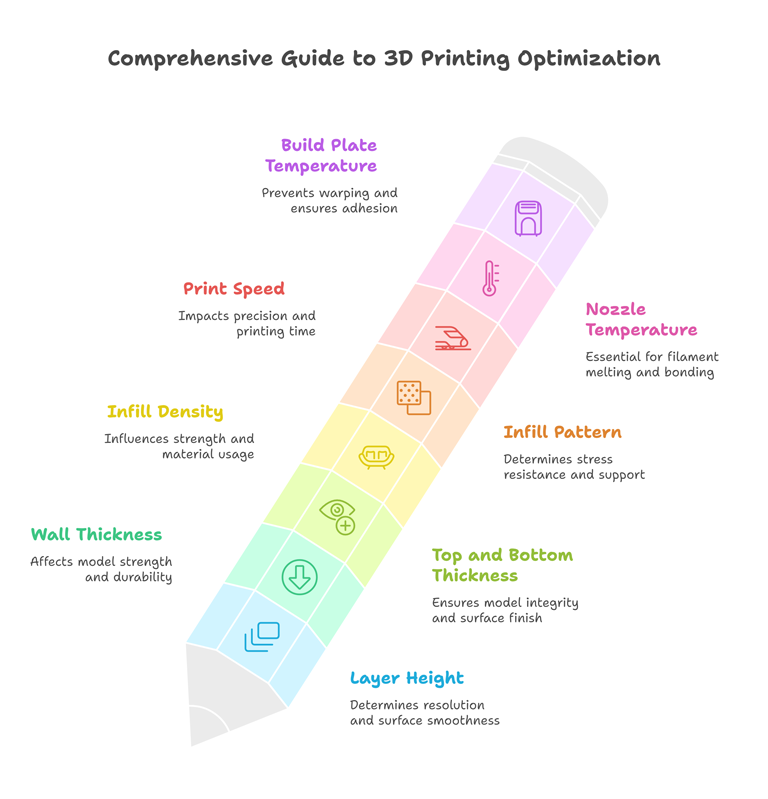
Layer Height
Layer Height determines how tall each printed layer will be. Smaller layers bump up the resolution and create smoother surfaces, but they naturally take more time to complete. Meanwhile, using thicker layers speeds up the process, though you might see each layer line more prominently. If high detail is crucial, aim for a layer height in the 0.05 mm to 0.2 mm range. On the flip side, if surface detail isn’t a priority and you just want a quick print, layer heights from 0.3 mm up to 1 mm can do the job.
Wall Thickness / Perimeters
Wall Thickness (or the number of perimeters) refers to how thick the outer shell of your model will be. Depending on your slicer, you can specify this thickness in millimeters or by selecting the number of walls. A thicker outer shell generally means a sturdier part. For smaller, delicate models, 2 walls or about 0.8 mm thickness often works fine. But if you’re printing a longer piece that might face stress, 4 walls or over 1.5 mm is a safer bet. Remember that simply increasing wall thickness can sometimes boost strength more than cranking up the infill density.
Top and Bottom Thickness / Layer Count
These settings tell the printer how thick (in millimeters) or how many layers to use on the very top and bottom of your model. The bottom layers create a strong foundation, while the top layers seal off the infill and give you a nice, closed surface. If you skimp on top layers, that infill might peek through, resulting in a rough look. For instance, at a 0.2 mm layer height, four or five layers on top is often enough, and three or four on the bottom will usually suffice. The lower your infill density, the more critical these top and bottom layers become.
Infill Density
Infill Density is all about how solid (or hollow) the inside of your print will be, expressed in percentages. Going with 0–15% saves time and material but offers minimal strength, so it’s ideal for decorative parts. Meanwhile, above 50% is considered high density, which delivers greater durability at the cost of more print time and filament usage. If you’re making, say, a purely visual display piece, 10% might be all you need. Many slicers default to around 20–30%, striking a decent balance between strength and efficiency.
Infill Pattern
The Infill Pattern refers to the shape or style the slicer uses to fill in the model’s interior. These come in both 2D and 3D varieties. A 2D pattern might resist force from a single direction better, while a 3D pattern generally handles stress from multiple angles. Think about what your print is for: something that needs to be super rigid from all sides might call for a pattern like Gyroid, while simpler prints often stick to more common styles (e.g., Line, Zigzag).
Print Speed
Print Speed is basically how fast your printer’s nozzle moves while laying down material, measured in mm/s. Slower speeds typically lead to more precise results (but take longer), while faster speeds cut down overall printing time but may cause issues like “ghosting” or vibration marks on your model’s surface. If you’re aiming for top-notch quality—like around 30–40 mm/s—keeping it slow and steady can help. A general range is about 40–60 mm/s for everyday prints, though modern machines can sometimes handle speeds of 300 mm/s and still look great.
Nozzle Temperature
Nozzle Temperature should match the type of filament you’re using. At the right temperature, the filament melts smoothly and bonds well. Too low, and you might get partial clogs or poor layer adhesion; too high, and you may lose detail because the plastic turns too runny. For instance, PLA often prints around 200–210°C, ABS around 230–250°C, and PETG in the ballpark of 220–240°C. A handy tip is to increase the first layer temperature by about 5–10°C to improve bed adhesion.
Build Plate (Bed) Temperature
A heated bed helps the print stick properly and prevents warping. Different materials prefer different ranges: PLA generally does well at around 50–60°C, ABS might like it closer to 100°C or so, and others lie somewhere in between. Another popular trick is slightly boosting the bed temperature for the first layer or two, ensuring it bonds solidly to the surface.
Cooling Fan
This fan blows air onto the freshly extruded filament, helping the layers solidify quickly and adhere well to each other. However, for some plastics (like ABS or Nylon), too much fan can actually cause cracking or warping, so you’d typically turn it off or keep it very low. As a general guideline, many people keep the fan off for the first couple of layers so the print sticks firmly to the bed, then turn it on according to the filament’s specific needs. With PLA, you might go 100% after layer two, while PETG might work best around 30–50%.
Initial Layer Settings
The first layer can make or break your entire print—no joke. Many folks opt for a slightly higher initial layer thickness compared to the rest, ensuring better adhesion. For example, if your normal layer height is 0.2 mm, you might push the first layer to 0.25 mm. Printing that initial layer more slowly (say 20 mm/s instead of your usual 60 mm/s) also helps with bed adhesion. And here’s another tip: you could even raise the bed temperature a bit for these first layers.
Supports
Supports act like temporary scaffolding for parts of the model that would otherwise be printed in midair—typically anything past a 45-degree overhang angle. You can choose “Touching Build Plate Only” (supports are built from the bed up) or “Everywhere,” which places supports even within your model’s inner geometry. That second option might make supports impossible to remove if they’re tucked away in small internal cavities, so be careful. The density and pattern of these supports also matter—you’ll want something sturdy yet easy to detach, often around 15% density.
Build Plate Adhesion Options (Skirt, Brim, Raft)
Sometimes the model’s shape or the filament type calls for extra measures to keep everything from peeling off during printing:
Skirt: A few outlines around your model that aren’t actually attached to it. It just primes the nozzle and lets you see if everything’s flowing right. Doesn’t do much for adhesion, but it’s a handy check.
Brim: Attaches to the base of your model like a little hat brim, expanding the contact area to combat corner lifting or warping. You simply remove it after the print finishes.
Raft: Several layers printed beneath the model, creating a solid platform. The model is then built on top of this raft. It’s fantastic for filaments like ABS or Nylon that are notorious for bed-adhesion headaches. For smaller parts or those with tiny contact points, a raft can really save the day.
Advanced Print Settings and Parameters
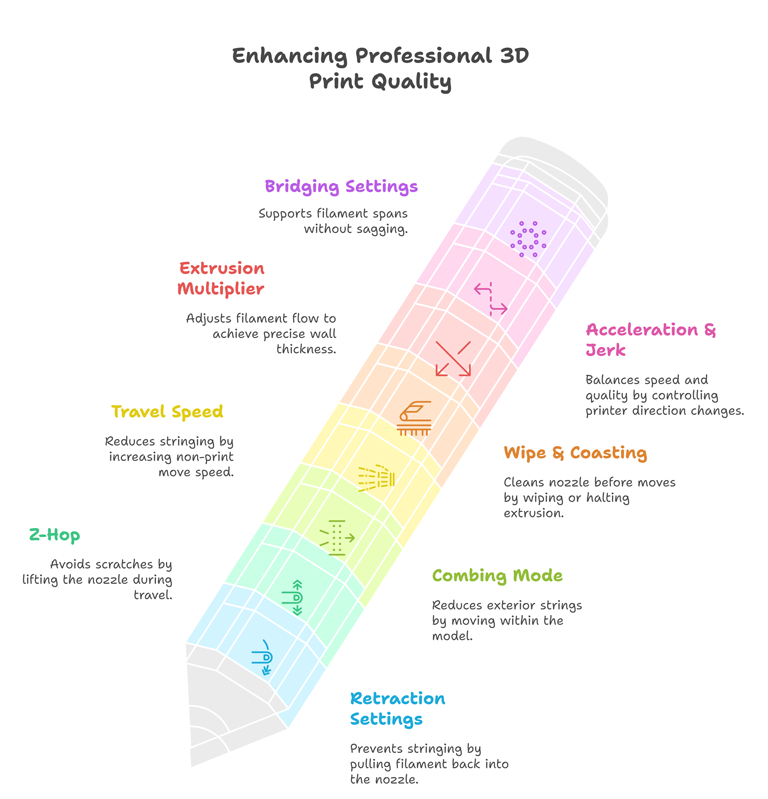
This section dives into some of the more detailed tweaks that can significantly impact print quality and performance. By fine-tuning these parameters, you can tackle everything from unwanted stringing to bridging challenges, all while keeping an eye on overall print speed and material usage.
Retraction Settings
Retraction is all about pulling the filament back into the nozzle when the print head isn’t actively laying down plastic. This helps prevent those thin, stringy bits—often called “stringing”—that can appear between travel moves. Once the nozzle is ready to print again, the filament is pushed forward once more.
Max Retraction Count / Minimum Extrusion Distance
This feature sets a limit on how often (and how aggressively) retraction can happen within a short span. If you’re only moving a tiny distance, you might not want the filament retracted repeatedly—doing so could grind or damage the filament. By restricting retraction on very brief travels, you keep your filament from getting overly worn.
Z-Hop (Z Lift)
Z-Hop (sometimes called Z Lift) instructs the print head to move up a bit during retraction so it doesn’t brush against the model while traveling. This avoids scratches or unwanted marks on the surface. A small caveat, though: using a high Z-Hop frequently can create slight banding on the Z-axis.
Combing Mode
Combing Mode keeps the nozzle traveling within the model’s interior during non-print moves. That way, any stray strings are more likely to form inside rather than on the outer walls, often reducing cleanup and improving the external finish. It can also shorten travel times since the nozzle takes a more direct path inside the print.
Travel Speed
Travel Speed is essentially the speed the print head moves when it’s not actively extruding. Pumping this value up can reduce stringing because the filament has less time to ooze, and it also cuts down overall print time. However, set it too high and machine vibrations might spike, which can harm print quality.
Wipe & Coasting
Wiping involves briefly rubbing the nozzle tip on the print (usually a specific area) to remove stray plastic before the next segment begins. Coasting, on the other hand, halts extrusion slightly ahead of a travel move, letting residual pressure push out any leftover filament. Modern slicers like Cura, PrusaSlicer, or Simplify3D often have these options built-in.
Extrusion Multiplier / Flow Rate
The Extrusion Multiplier (Flow Rate) defines how much filament is fed in relative percentages. Ideally, if your printer is well-calibrated and your filament diameter is consistent, you’d leave it at 100%. But in real-world scenarios—where you might have a slightly off-diameter spool or unique material behavior—you can tweak this setting so that your walls measure exactly what they should. A quick wall thickness test will usually reveal if you need to dial flow up or down.
Acceleration & Jerk
These settings dictate how rapidly the printer accelerates when changing directions. Cranking up acceleration can shorten print time but might produce more vibrations, leading to artifacts on the print. Dialing it down, along with jerk, usually yields cleaner edges and fewer mechanical jitters—though the print takes a bit longer.
Bridging Settings
Bridging is the act of spanning filament between two points without support. Slow down the bridging speed and crank up the cooling fan for best results. That way, the filament solidifies faster and sags less. This technique is a lifesaver when you need to avoid support structures or keep the interior of a model nice and tidy.
Ironing
Ironing gives your top surfaces a smoother finish by passing the hot nozzle over already-printed layers at a very low extrusion rate. In other words, it “melts” down tiny bumps for a cleaner look. You’ll often see recommendations like running the nozzle at 10% of your normal flow rate and around 30% of your regular print speed. This method can make your print’s upper layers look a lot more polished.
Adaptive Layer Height
Adaptive Layer Height means you can set different layer thicknesses for different regions of the model. It’s great when you need detailed resolution in some places (like curved surfaces or decorative sections) but don’t want to waste time printing everything at a super-fine layer height. Thicker layers where detail isn’t critical can drastically cut total print hours, while thinner layers appear in areas that benefit from extra precision.
Advanced Support Settings
Support structures can make or break complex prints. Ideally, you want something sturdy enough to hold up those big overhangs, but still easy to pop off once done. Lower infill density (like 20%) is often enough, but you can ramp it to 30–40% for tough spots. For shape patterns, zigzag is typically easier to remove, while triangular or grid supports offer more stability.
Stair Step Height: Reduces the contact area where support meets the model by building a stepped interface, simplifying removal.
Join Distance: Merges support columns that are super close, forming a single pillar.
Horizontal Expansion: Thickens narrow support columns to increase strength.
Support Layer Thickness: Because detail isn’t essential in support structures, you can print them with a thicker layer height than the model, speeding things up.
Gradual Support Infill: The higher layers near the model are denser, while the lower sections remain sparse, saving filament and improving breakaway ease.
Multi-Extruder Management
When a printer has two or more extruders, things get a bit more intricate. Extra steps like retraction for idle nozzles, prime towers, and ooze shields come into play to keep colors (or materials) from bleeding into each other.
Nozzle Switch Retraction: Whenever the slicer switches from one extruder to another, the inactive nozzle retracts the filament a bit. Sometimes you might increase that retract distance if you’re still seeing leaks.
Prime Tower: A small tower printed off to the side, ensuring each newly activated extruder is fully primed (and any leftover color or material is purged) before continuing the main print.
Ooze Shield: A perimeter-like structure around your model that catches any drips from an idle extruder, protecting the actual print.
Color Change Order & Cooling: Advanced slicers can cool and heat extruders on the fly. You might also tweak “Standby Temperature” so an inactive extruder won’t ooze as much—just note that reheating will add a bit of delay.
Spiral Vase Mode
“Vase Mode” (Spiralize Outer Contour) prints a single continuous wall in a smooth spiral, ideal for tall, hollow objects like vases. Because there’s no start-stop at each layer, you get fewer seam lines and a uniform finish. Plus, it’s often a bit faster than standard multi-wall printing while offering a nice, seamless aesthetic.
Test of Individual Postprocessors/Slicer Engines
In this section, we’re taking a close look at a scientific study where tests were run to compare the slicer engines Slic3r, Skeinforge, and Cura Engine. These tests were conducted using the Repeiter-Host software, which houses all three slicer engines.
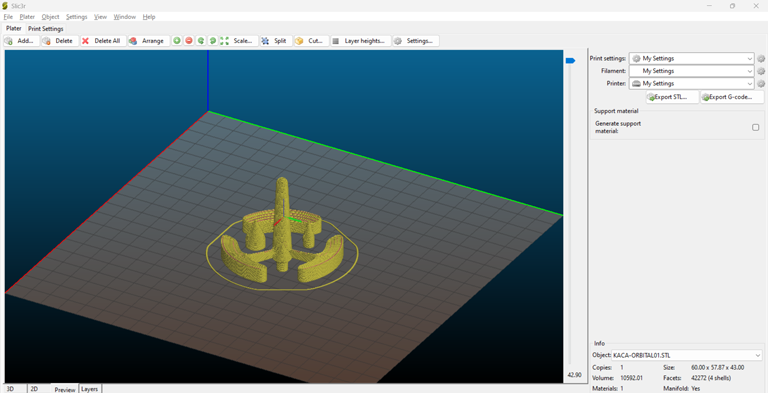
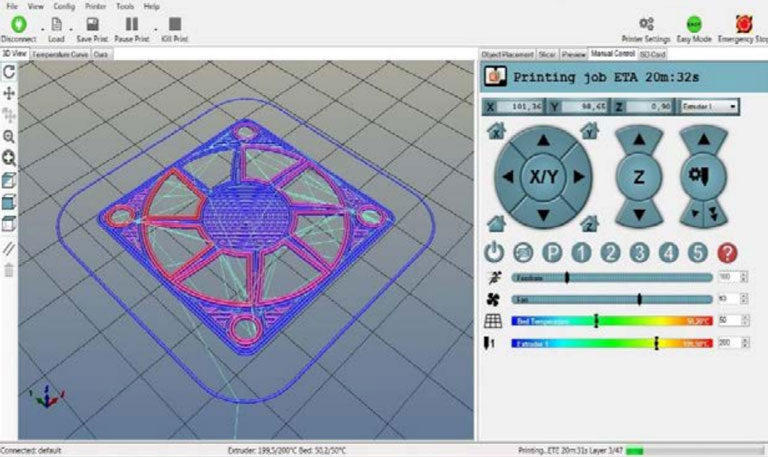
Test Setup Details
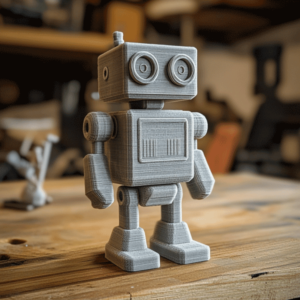
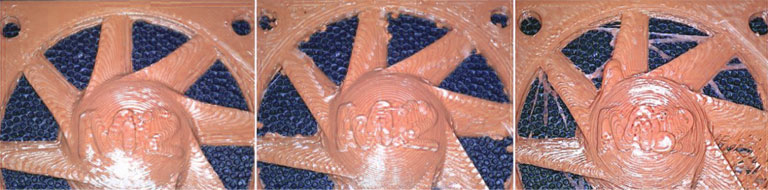
For the purpose of comparison, G-Codes were generated with each slicer engine. The same 3D model and identical parameters were used throughout the process. When generating the G-Code, parameters such as filament diameter, layer height, and operating temperature were uniformly applied. To achieve more detailed prints, a layer thickness of 0.2 mm was chosen, with a filament diameter of 1.75 mm. The test object is displayed alongside.

Comparison of Test Results
Using the information gathered from the G-Codes generated by each slicer engine under the same settings—and comparing the resulting prints—we can effectively evaluate their performance.
Based on the test results, the data shows that Cura comes out ahead in terms of speed. However, researchers have pointed out that this engine isn’t ideal for detailed objects; when printing complex, intricately indented items, it tends to skip certain contours randomly.
It appears that Slic3r uses more material for the same model.
Skeinforge is a great option for those who want to experiment and achieve the best possible print quality. The table indicates that a longer G-Code generation time might signal a more finely tuned process. Moreover, unlike the other two slicer engines, Skeinforge consistently takes support structures into account.
| Postprocessor | Cura Engine | Slic3r | Skeinforge |
|---|---|---|---|
| Estimated print time (min) | 13 | 25 | 34 |
| Real print time (min) | 19 | 28 | 38 |
| Length of used material (mm) | 1069 | 1287 | 1196 |
| Number of coated layers | 48 | 47 | 49 |
| G-code generating time (s) | 3 | 8 | 92 |
| G-code size (kB) | 1001 | 722 | 668 |
When you look at the print results, you can tell that objects printed with the Cura engine boast a smoother surface finish and experience fewer plastic build-ups. On the flip side, even though Skeinforge sometimes shows some plastic build-ups, it seems to focus more on mitigating this issue—using tweaks like retracting the nozzle and speeding up non-print moves—to really maximize print quality.
Another factor we examined was the gap between the estimated print time and the actual print time. You can see the percentage deviations in the table below. Skeinforge came out on top with just a 10.5% deviation, followed by Slic3r at 10.7%, while Cura Engine lagged behind with a 31.6% deviation.
| Postprocessor | Deviation (min) | Percentage Deviation (%) |
|---|---|---|
| Cura Engine | 6 | ≈ 31.6% |
| Slic3r | 3 | ≈ 10.7% |
| Skeinforge | 4 | ≈ 10.5% |
Print Surface and Bed Calibration
Printer bed settings have a direct impact on print quality. Often, the main reason for a failed first layer is a misaligned bed—which leads to poor adhesion and, naturally, subpar print quality. In short, successful FDM 3D printing is all about getting your bed calibration right. There are three methods to achieve proper bed calibration:
• Manual Calibration: You can check the gap between the bed and the nozzle with a simple piece of paper. (Note: Manual calibration has honestly been the trickiest part for me. The key is to slide the paper in between the nozzle and the bed so that it isn’t too tight nor too loose. When you pull it back, you should feel just enough resistance to know it’s set correctly.)
• Automatic Calibration: With sensors at work, you can measure the bed’s tilt and let the system auto-correct it. This feature is a major comfort booster and should be high on your checklist when buying a 3D printer.
• Dynamic Calibration: This method uses a software-based correction mechanism, letting you tweak the settings even while printing is in progress.
The material of your print bed also affects first-layer adhesion. Each type of bed material behaves differently—for example, a glass bed’s flat surface tends to yield a higher quality finish, while PEI-coated beds offer strong adhesion that makes print removal easier. With magnetic or flexible beds, you can smoothly remove your prints once they’re done. Recommended bed temperatures are 60°C for PLA and 90–110°C for ABS.
During printing, the machine follows G-Code commands that control its movements and extrusion amounts. Setting up these G-Code instructions correctly is crucial for the printer to run smoothly—the slicing software prepares them and sends them over for execution.
Filament Selection
• PLA Filament: Eco-friendly and easy to print with.
• ABS Filament: More durable and tends to perform better in printers with heated beds and enclosed chambers.
• PETG Filament: Durable, flexible, and suitable for both indoor and outdoor projects.
• TPU Filament: Perfect for creating flexible parts.
• Nylon Filament: Chosen for applications that require extra strength and durability.
• Wood or Metal-Infused Filaments: Ideal for decorative or specialized functional prints.
RepRap Mendel and Open-Source 3D Printers
When it comes to open-source 3D printers, the RepRap Mendel stands out as the most popular model. Its standout feature? Users can print their own parts to expand the system—a major plus for DIY enthusiasts. In today’s home 3D printer market, DIY printer projects are also gaining traction. The RepRap Mendel is a top choice among hobbyists, largely because it uses low-cost components.
FDM 4D Printing Technology
Lately, FDM 4D printing has been on the rise. This cutting-edge technique combines smart materials with programmable structures, allowing printed objects to change shape after production. Its most common applications are in the fields of medicine, aerospace, and robotics. For instance, FDM 4D printing can create biomedical implants that expand when exposed to water or sensors that react to temperature changes.
References
Kocisko, M., Teliskova, M., Torok, J., & Petrus, J. (2017). Postprocess options for home 3D printers. Procedia Engineering, 196, 1065–1071.
Repetier. (n.d.). Repetier – 3D Printing Solutions. Retrieved from https://www.repetier.com
Slic3r. (n.d.). Slic3r – Open Source 3D Printing Slicer. Retrieved from https://slic3r.org
Ultimaker Cura. (n.d.). Ultimaker Cura – Advanced 3D Printing Software. Retrieved from https://ultimaker.com/software/ultimaker-cura/