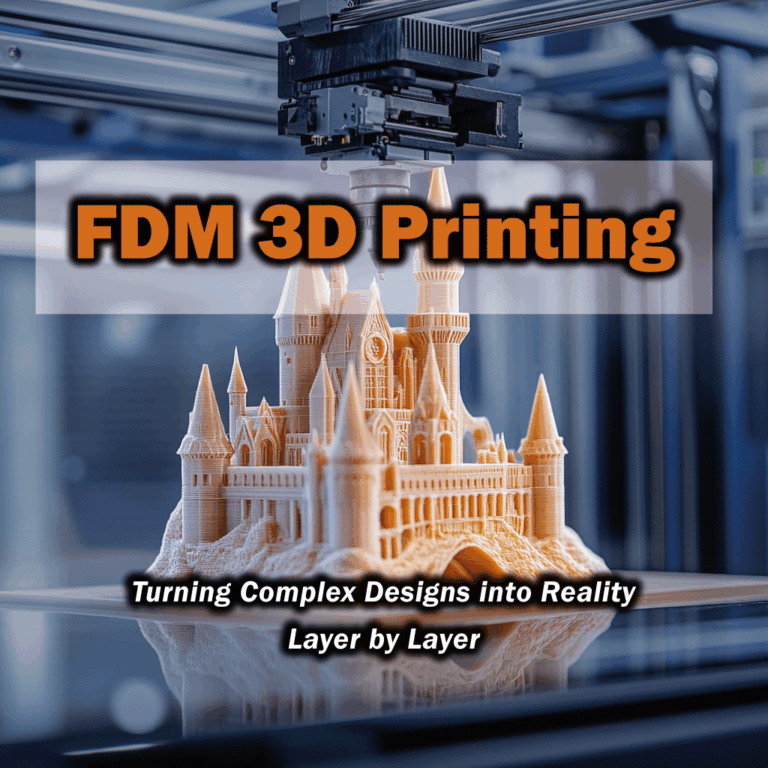


Material Extrusion (MEX) 3D Printing: A Promising Guide to Principles, Research & Applications
Material Extrusion (MEX) is one of the most widely used additive‑manufacturing methods in the 3D printing universe. In this guide you’ll find everything from first principles to advanced applications, laid out in plain English yet with the academic rigor engineers expect. Whether you’re a weekend maker or a seasoned professional, the finer points of MEX are unpacked here in a way that just… clicks.
What Is Material Extrusion?
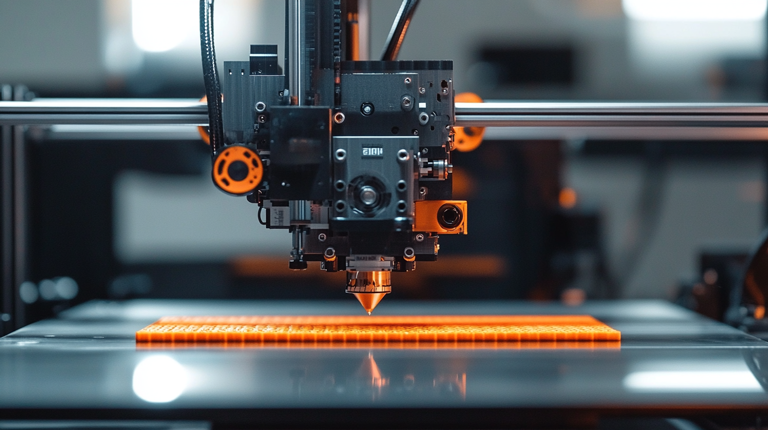
Material Extrusion is an additive process in which a nozzle selectively deposits material, building a digital model layer by layer. The best‑known flavor is FDM (Fused Deposition Modeling), where a thermoplastic filament is melted in a hot end and extruded as a thin bead. FDM—also called FFF (Fused Filament Fabrication)—dominates desktop and industrial 3D‑printing alike. A slicer converts the model into G‑code, the printer tracks that path, and either the print bed drops or the nozzle rises to make room for the next layer until the part is done.
MEX in the ISO/ASTM 52900 standard is one of seven main additive categories. Key traits include:
Layer‑by‑Layer Manufacturing: material is deposited in thin cross‑sections that fuse into a solid part.
Nozzle‑Driven Feed: a polymer—usually a thermoplastic—flows through a moving nozzle that parks material at precise XY coordinates, then re‑indexes on the Z axis.
Digital Control: every motion and extrusion rate is dictated by G‑code generated in the slicer.
Support Structures: overhangs get temporary scaffolds that snap off or dissolve in water after printing.
A quick mental picture: think of drawing with a hot‑glue gun, only the gun glides over the bed in X‑Y while stepping up in Z. Those stacked beads become your object.
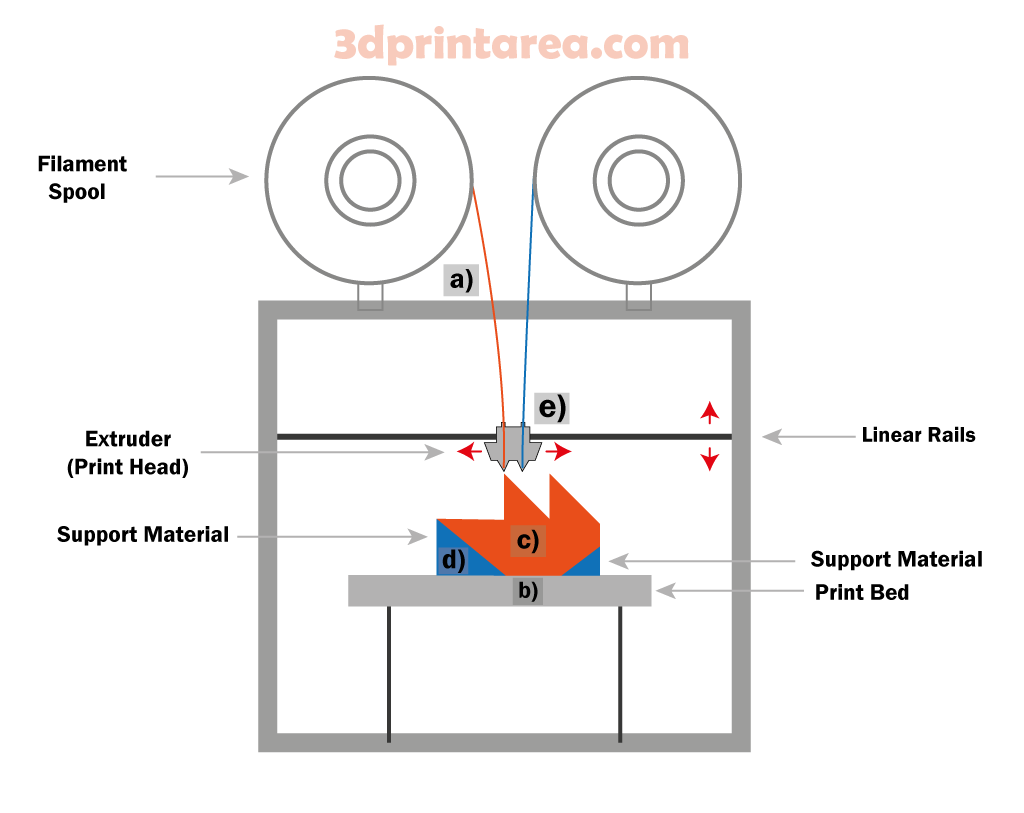
A classic FDM setup pulls filament from a spool (a), feeds it into a heated extruder (e), and deposits a molten trace onto the build plate (b) , gradually shaping the part (c). After each pass, the extruder (e) rises by one layer height, and if the design has nasty overhangs, vertical supports (d) grow right alongside.
MEX’s big draw is its simplicity and material flexibility. Filament comes on handy spools, machines are budget‑friendly, and running costs are low. No wonder you’ll spot MEX printers everywhere—from hobby rooms to factory floors. Because “FDM” is a Stratasys trademark, the open‑source crowd often says FFF instead, yet both terms describe the same dance: melt, deposit, repeat.
Working Principle of Material Extrusion
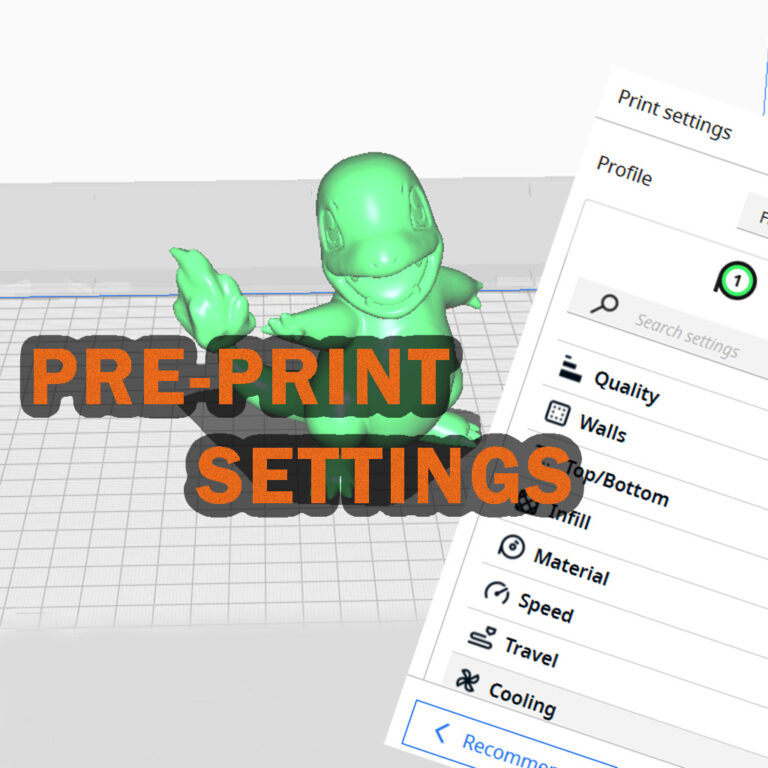
Model & Slice – Design the part in CAD, toss it into a slicer, choose your layer height, and out pops a G‑code file with every move choreographed.
Prep the Machine – Load the filament, clean the build plate, slap on tape or glue if needed, then heat the bed (say 60 °C for PLA, 100 °C for ABS) and the nozzle (200 °C / 240 °C respectively).
Heat & Prime – Once the hot end hits temp, the extruder pushes filament through the heater block; the first layer is laid down slowly for a rock‑solid grip.
Build the Layers – The nozzle traces each layer like it’s coloring inside invisible lines, fills in the infill, then steps up one layer height. Rinse and repeat until the CAD file becomes a real‑life thing. Cool & Solidify – A part‑cooling fan (especially with PLA) freezes each strand fast so edges stay crisp.
Finish Up – When the last layer lands, the printer cools. Pop the part off with a spatula, snap off supports, maybe sand a touch, and you’re done.
The beauty here is flexibility: hollow shells, tortuous channels—shapes injection molding would flat‑out refuse—are fair game. One machine, endless geometries, zero tooling cost.
Support Material and Secondary Extruders
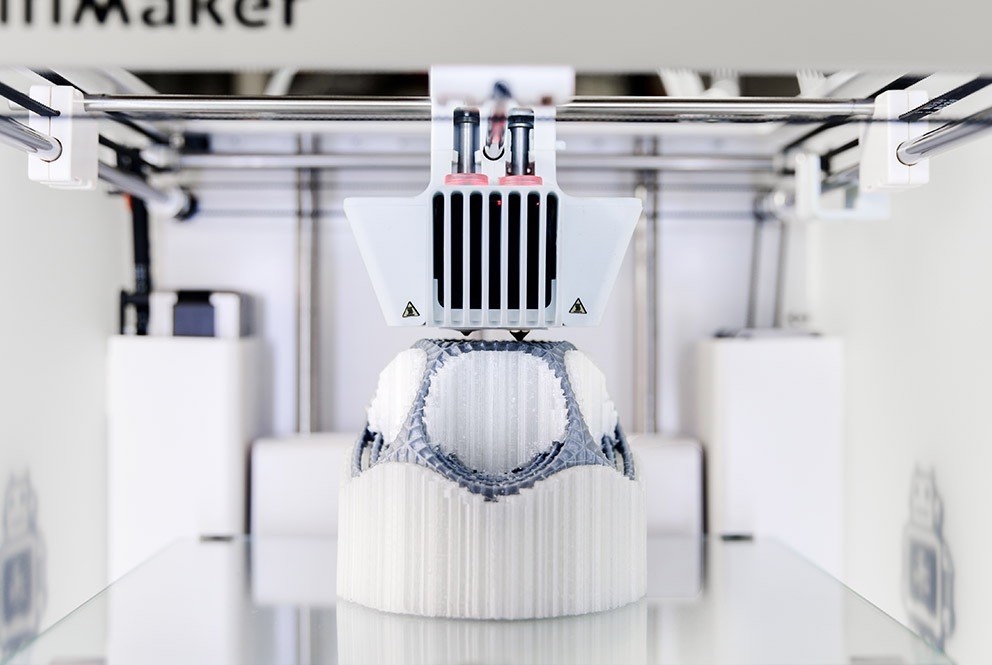
Most printers tackle model and support with a single nozzle, but dual‑extruder rigs open cool possibilities. You can print the part in, say, PLA while the second head spits out water‑soluble PVA scaffolding—drop the finished piece in warm water and watch the supports melt away. Dual setups also let you fuse rigid and flexible polymers in one go or add splashes of color without pausing the job.
Wrapping It Up
At its heart, Material Extrusion is a “heat, squirt, cool” loop—simple to grasp, revolutionary in impact. Stick around; the chapters ahead dive deeper into materials, thermal tricks, motion control, and more.
Material Extrusion Variants (FDM vs. other MEX methods)
When people think Material Extrusion, the first image that pops up is a filament‑fed FDM/FFF printer. Yet the extrusion principle covers several sub‑methods, each with its own way of feeding material. Broadly, MEX applications fall into four main buckets:
Filament‑Fed Extrusion (FDM/FFF) – The go‑to MEX method. A thermoplastic—usually 1.75 mm or 2.85 mm in diameter—unspools like fishing line into the hot end. Fused Deposition Modeling (FDM), coined and patented by Stratasys, kicked things off; once the patents lapsed, the open‑source crowd embraced the same trick under the name FFF (Fused Filament Fabrication). From hobby benches to industrial prototyping labs, filament feed has become the desktop default because it’s dead‑simple to handle.
Granule/Pellet‑Fed Extrusion (FGF) – Forget filament: this setup chews through raw plastic pellets. Fused Granulate Fabrication (FGF) slashes material costs and lets you print huge parts. Picture BAAM (Big Area Additive Manufacturing) spitting out car‑sized ABS pieces for the auto and aerospace world. Pellet systems rule in heavy‑duty jobs—construction molds, meter‑scale components—and happily swallow recycled plastic straight from the grinder.
Paste / Viscous‑Liquid Extrusion (Ceramic, Food, Bio) – Extrusion isn’t only for plastics. Anything with a toothpaste vibe can be pushed through a nozzle: clay, ceramic slip, cement paste, melted chocolate, cookie dough—even cell‑laden hydrogels for bioprinting. A syringe or pump forces the goo out; in robocasting, a ceramic‑filled paste is laid down at room temp and hardened later. Bio‑inks get printed cool to keep cells happy. Food printers squeeze out chocolate swirls layer by layer for edible art. It’s slower than FDM and the cure time can be tricky, but the cross‑industry potential is massive.
Multi‑Extruder & Hybrid Systems – Some rigs juggle more than one head: filament in one, paste in another—true hybrid printing. Toss a six‑axis robot arm into the mix and you can extrude in any direction (non‑planar printing), smoothing out layer lines over curves. Industrial robots armed with extruders now weave free‑form giants—single‑piece chairs, whole sculptures—without breaking a sweat.
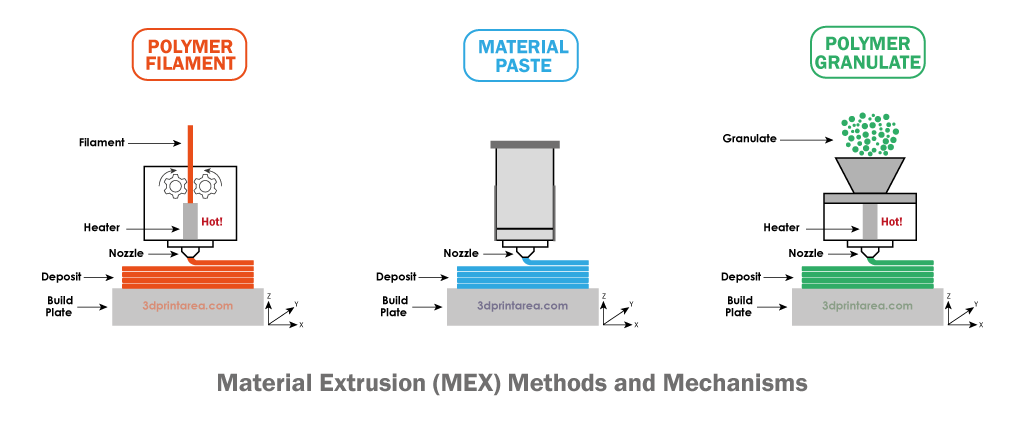
The graphic above lays it out: filament feed on the left, paste in the middle, pellets on the right. Filament types pull wire off a spool; pellet systems melt granules funneled into a heated screw; paste printers push material from a pressurized cartridge. Same core idea—squeeze material through a nozzle, stack the layers—but each flavor needs its own mechanics. Filament drives use hobbed gears, pellet extruders rely on an auger or piston, while paste rigs lean on pneumatics.
FDM vs. FFF vs. MEX – Quick terminology check: FDM is a Stratasys trademark, FFF is the open‑source tag for the identical process, and MEX is the ISO/ASTM catch‑all for any extrusion‑based additive method. In other words, FDM/FFF sits inside the broader MEX family. Whichever label shows up in this guide, they all share one heartbeat: layer‑by‑layer extrusion.
Bottom line? Material Extrusion morphs to fit the feedstock and the job. A desktop PLA figurine, a concrete wall, even a living‑tissue scaffold—all spring from the same “selectively squirt material” mantra. That flexibility makes MEX a seriously adaptable platform.
Materials and Their Traits
Material Extrusion can chew through a huge palette. Thermoplastics lead the pack, but composites, elastomers—and yes, even metal or ceramic powders bound in plastic—are fair game. Here’s the usual lineup:
PLA (Polylactic Acid) – Bio‑based, low‑warp, prints like a dream at ~190‑220 °C. Great for classrooms and hobby kits. Stiff yet brittle, softens above ~60 °C, and it’s nearly odor‑free. PLA+ tweaks the recipe for extra toughness and heat resistance.
ABS (Acrylonitrile Butadiene Styrene) – The same stuff LEGO bricks are made from. Prints around 230 °C, needs a 100 °C bed and preferably an enclosure—otherwise it warps like crazy. Tougher and more heat‑steady (~100 °C) than PLA but does kick out styrene fumes, so mind the ventilation. Variants like ABS+ or ASA boost UV stability or ease machining.
PETG (Polyethylene Terephthalate Glycol) – Sits between PLA and ABS. Prints ~230 °C / 70 °C bed, offers a nice blend of strength and flex, low warp, and comes in clear grades for see‑through parts. Keep it dry—PETG loves to drink moisture.
Nylon (Polyamide, PA) – Tough, abrasion‑resistant, perfect for gears and hinges. Needs ~250 °C nozzle, 70‑90 °C bed, enclosed chamber helps. Hygroscopic to the max—dry it or suffer bubbly prints. Carbon‑fiber‑reinforced blends push stiffness up a notch.
TPU/TPE (Thermoplastic Polyurethane / Elastomer) – Rubber‑like flexibility in filament form. Prints 220‑250 °C, slow feed (20‑30 mm/s) to stop it from coiling in the gears. Great for phone cases, gaskets, shoe soles. Chemical‑resistant and tear‑tough.
PC (Polycarbonate) – High impact, high heat (~110 °C), but a diva to print: 260‑280 °C nozzle, 120 °C bed, strict temp control. Dial it in and it outperforms ABS. Carbon‑fiber PC is a thing—use a hardened nozzle.
PEEK & ULTEM (PEI) – Top‑shelf engineering plastics for aerospace and medical implants. Demand 400 °C hot ends, 150 °C beds, and a toasty build chamber. Pricey, yes, but they laugh at 250 °C service temps.
Composite Filaments (Filled Materials) – Blend thermoplastics with fibers or powders for new tricks. Carbon‑fiber PLA/Nylon/PETG prints light and rigid—ideal for drone frames. Glass fiber ups stiffness. Metal‑filled PLA gives a bronze or copper heft you can polish. Wood‑fill PLA smells like sawdust and sands like pine—just remember: hard fillers chew brass nozzles, so switch to steel.
Soluble Support Filaments (PVA, HIPS) – Print complex overhangs, then dunk the part: PVA melts in water (pairs with PLA), HIPS dissolves in limonene (mates with ABS).
Metal & Ceramic Filaments – Up to 90 % powder bound in plastic. Print the “green” part, then sinter it in a furnace to burn out the binder and fuse the particles—think BASF Ultrafuse 316L for stainless. Ceramic powders follow the same script. Great for R&D, trickier for production due to shrinkage calculations.
That’s just the highlight reel—new filaments drop every month: antimicrobial plastics, conductive blends for printed circuits, flame‑retardant V0 grades, even glow‑in‑the‑dark PLA that smells like vanilla. The golden rule: make sure your printer can hit the temps and your part’s end‑use matches the material’s superpowers.
We’ll dig deeper into material selection next time, but remember: with MEX you can swap from a squishy silicon‑like print to a metal‑look component on the same machine—just change the spool. Traditional manufacturing needs a line‑up of tools; MEX needs a minute and a fresh filament.
Applications: Where Material Extrusion 3D Printing Makes a Mark
Material Extrusion has marched far beyond “just prototyping.” From shop‑floor jigs to space‑grade parts, its reach keeps growing. Below you’ll find the headline sectors—and a few eye‑opening examples—where MEX truly pulls its weight.
Automotive Industry – Car makers lean on 3D printing to whip up concept parts and test‑fit prototypes in days, not weeks. Think interior trim, dashboard mock‑ups, even experimental engine housings printed in engineering‑grade ABS. On the line, bespoke jigs, fixtures, and ergonomic grips roll out of FDM printers for a fraction of CNC cost. Motorsports outfits love the speed boost; Formula SAE teams have run FDM‑printed intake manifolds right on the track. At the other end, vintage‑car restorers crank out impossible‑to‑source spares on demand. Ford and BMW both report hefty savings after switching worker‑assist tools to in‑house 3D prints.
Aerospace & Spaceflight – Weight is the enemy aloft, so high‑performance polymers like Ultem 9085 are a godsend. NASA’s Mars rovers carry roughly seventy additively made parts—shapes a machine shop couldn’t dream up—printed in space‑rated thermoplastic. Stratasys and Aurora Flight Sciences flew an unmanned aircraft whose wings and fuselage were FDM‑printed in Ultem; Boeing’s 777 sports cabin ducts and interior panels born from the same tech. Swap metal for polymer where you can, shed kilos, and watch the fuel bill smile.
Defense & Space Ops – Military teams value rapid, field‑level fixes. Everything from custom drone shells to ammo canisters—and yes, a handful of lightweight weapon prototypes—has been run off on FDM rigs. On a submarine or carrier, a 3D printer means a busted valve knob gets re‑made overnight rather than shipped halfway around the globe. The ISS even hosts a Made In Space printer: astronauts crank out small replacement parts instead of waiting weeks for the next supply launch.
Medical & Healthcare – Surgeons rehearse tricky operations on patient‑specific models derived from CT scans, printed in PLA or ABS. Sterilizable cutting guides for hip or spinal implants roll straight from printer to OR. Custom tracheal stents have been trialed in bio‑compatible TPU; dentists prototype aligners and surgical trays (resin dominates here, but FDM fills the rapid‑test niche). Bioprinting research extrudes cell‑laden hydrogels to grow tissue scaffolds—organ printing isn’t sci‑fi anymore, it’s a roadmap. Start‑ups iterate device housings and limited‑run enclosures via MEX, while projects like E‑nable deliver ultra‑cheap prosthetic hands to children worldwide.
Architecture & Construction – Giant gantry printers squirt special concrete blends to layer up walls and even whole houses; pioneers like Contour Crafting aim to slash build time and cost. Domestic R&D groups are testing small‑scale concrete printers for on‑site structures. On the design side, architects churn out scale maquettes in PLA or ABS, bringing wild geometries from screen to hand before the client meeting. City‑planning models and block‑scale mock‑ups? 3D printers handle those too.
Education & Research – From middle‑school STEM labs to PhD workshops, MEX machines turn abstract lessons into hold‑it‑in‑your‑hand reality. Mechanical‑engineering students print gearboxes; biomedical majors model bone plates; electronics teams encase prototypes without booking shop time. Makerspaces and campus libraries keep printers on tap so anyone can test an idea before it fades. Robotic‑competition teams practically live at the printer, swapping designs nightly.
Personal Projects & Hobbies – Home users get wildly inventive: cosplayers craft screen‑accurate armor, RC enthusiasts print custom quad‑copter frames, and DIYers spin up quick fixes like a snapped vacuum‑cleaner latch. During the pandemic, hobbyists printed face‑shield frames and door‑openers by the thousands. Sites like Thingiverse and MyMiniFactory hand out millions of free STL files—download, slice, print, done. Need a fridge‑shelf clip at 2 a.m.? Fire up the printer and make one before morning coffee.

Art & Design – Sculptors output complex digital forms as physical maquettes—or final pieces—on FDM machines. Fashion houses have strutted 3D‑printed dresses made with flexible TPU filament. Industrial designers iterate sleek concept models, interior decorators test bespoke lampshades, and luthiers even print guitar bodies with lattice‑light interiors. The takeaway? If you can model it, a nozzle can likely draw it in plastic.
Big Picture
From cars to cathedrals, hospitals to home workshops, Material Extrusion keeps rewriting how we make things. The perks are clear: zero tooling cost, instant design tweaks, economical small batches, and minimal waste on complex parts. Digital inventories—where files sit in the cloud until you hit “print”—are trimming spare‑part stockpiles worldwide. Sure, MEX still wrestles with speed on mass runs, micron‑level tolerances, and true metal or electronic integration. Yet progress is lightning‑fast, and new sectors sign on each year. Stick around; next we’ll unpack material picks and dial‑in tips for bulletproof prints.
Material Selection and Print Parameter Optimization
Using a MEX‑style 3D printer successfully hinges on two essentials: choosing the right material and dialing in the right print parameters. Different filaments bring different properties to the table, and each one demands a specific recipe of temperature, speed, and cooling to deliver its best. In this section we explain how to pick the material that fits your application and how to tune your printer for optimum results.
Material Selection Criteria
When you start a project, first decide which properties the finished part absolutely must have. Then choose your filament accordingly:
• Mechanical Strength: Will the part bear loads or take impacts? If you need higher toughness, swap PLA for sturdier plastics like ABS, PETG, or nylon. Nylon excels in gears and hinges; ABS / ASA in housings and enclosures; PETG in toys that mustn’t shatter. Carbon‑fibre‑filled blends are worth a look when extra stiffness is critical.
• Heat Resistance: Will the part face high temperatures? A PLA clip in an engine bay is a bad idea; it softens around 50–60 °C. Choose ABS or polycarbonate, which hold shape beyond 100 °C. For extreme heat (200 °C +), advanced filaments such as PEEK or ULTEM are the go‑to.
• Environmental Factors: Will the part live outdoors under UV or in damp conditions? ASA beats ABS for sunlight; PETG or PP shrug off moisture. PLA struggles in sun and heat. If chemicals like fuel or oil are lurking, reach for chemically resistant plastics (PP, PE, certain nylons).
• Flexibility or Rigidity: Does the part need give, or must it be rock‑solid? A flexible wristband or gasket calls for TPU / TPE; a stiff gear suits nylon or PC. Pick the filament whose modulus matches your design.
•Aesthetics & Surface Finish: If looks are paramount, pick filaments that print smooth or finish easily. A matte, detail‑friendly PLA excels in architectural models; wood‑filled PLA nails a timber vibe. ABS sands and vapor‑polishes beautifully, making it great for visual prototypes. For clear parts, transparent PETG or PC variants do the job.
•Biocompatibility & Food Contact: Parts that touch people or food demand care. Styrene in ABS can be problematic; PLA is often safer, though its porosity limits long‑term food use. PETG is better for drinkware because it repels water and is widely food‑safe. Always use smooth surfaces and, ideally, FDA‑approved filament. True implants move into PEEK territory, backed by strict approvals.
•Printing Difficulty & Hardware Compatibility: Respect your machine’s limits. A hotend capped at 260 °C struggles with PC or nylon and can’t touch PEEK. A bed that tops out at 60 °C will give ABS headaches. No enclosure? Large ABS prints warp. Bowden extruders dislike very soft TPUs. Factor in nozzle temp range, bed temp, extruder type, cooling fan, and nozzle wear resistance. Beginners with entry‑level printers should start with PLA, graduate to PETG, and only then tackle trickier plastics like ABS or nylon.
• Cost: Finally, price matters. PLA and ABS are budget‑friendly; exotic composites and high‑performance polymers cost a lot more. One kilogram of PLA might run $20, whereas a kilogram of PEEK can reach $600–700. Balance budget and requirements: prototype in PLA, then print the final part in ABS if that makes sense.
Print Parameter Optimization
Even with the perfect filament, print quality lives or dies by your settings. Every printer–filament combo has its own sweet spot, which you’ll find through patient trial and error. Below are the most critical parameters in MEX printing and tips to tame them:
• Nozzle Temperature: Dial in the temperature range where the filament melts and flows smoothly. Manufacturer numbers (200 °C for PLA, 240 °C for ABS, etc.) are only a starting point. Too cool and the filament half‑melts, causing under‑extrusion or weak layer bonding; too hot and details blur, sagging and stringing erupt, and the filament may scorch. A temperature tower that steps from, say, 180 °C to 220 °C for PLA helps pinpoint the sweet spot. Even pigment can shift the optimum, so fine‑tune each spool.
•Bed Temperature & First Layer: The build plate’s heat locks down the first layer and wards off corner lift. Aim for 50–60 °C on PLA, 90–110 °C on ABS, about 70 °C on PETG. Even “cold‑bed” materials (certain PLAs, flexibles) benefit from mild warmth. Because that first layer underpins the whole print, run it slower (about half normal speed) and thicker (e.g., 0.3 mm if layers are 0.2 mm) to boost adhesion and iron out surface ripples. Level the bed carefully: too close and filament jams, too far and it won’t stick. A sheet‑of‑paper test or an auto‑level sensor (BLTouch, etc.) saves grief. Brims or rafts add insurance, and a wide brim keeps ABS corners from warping.
• Print Speed: Speed shapes both quality and turnaround. Lower speeds give cleaner detail and stronger layer bonds but drag out print time. Higher speeds finish quicker yet risk blurring corners and overheating thin walls. Around 50–60 mm/s suits most filaments; tiny detailed parts may prefer 20–30 mm/s, hefty rough parts 80–100 mm/s. Printer rigidity and hotend throughput (nozzle size, melt zone) set the ceiling: high‑flow “Volcano” hotends or modern CoreXY rigs can sprint past 150 mm/s. Stay mid‑range for reliable results, and let infill race while outer shells cruise to balance speed and polish.
• Layer Height: This setting drives surface finish and mechanical traits. The common 0.4 mm nozzle likes 0.2 mm layers (≈ 50 % of nozzle diameter). Thinner layers (0.1 mm) smooth slopes and curves and often raise tensile strength by improving inter‑layer fusion; thicker layers (0.3–0.4 mm) print faster and can boost toughness and compressive strength because there are fewer weak interfaces. Decide based on the part’s demands: fine layers for sleek, strong parts; thick layers for speed when “good enough” strength will do. Many makers settle on 0.2 mm as the happy medium, but test prints are the sure proof.
• Infill Density & Pattern: How full you make the part controls both strength and print time. A solid 100 % infill is rock‑hard but slow and costly. Most jobs thrive on 15–40 %. Increase density or wall thickness where screws bite or loads concentrate. Pattern matters too: gyroid spreads forces evenly, hex handles compression well. More infill raises strength until internal stress and cooling mismatches bite back, so smarter patterning often beats brute‑force 100 % density.
•Printing Environment & Cooling: Some plastics like ABS crave slow, even cooling; others like PLA need brisk airflow for crisp detail. Tune the part‑cooling fan to suit: PLA and PETG run with 50–100 % fan, ABS / ASA / nylon / PC with the fan off or barely on (maybe 20 % for bridges). Cooling fan also shapes surface quality: too much flow can weaken layer adhesion; too little flow leaves PLA shiny but saggy. For strength‑critical parts, reduce fan and raise nozzle temperature a notch so layers fuse deeply. A big ABS print, enclosed and fan‑off, cools slowly and prints toughest.
• Other Settings (Retraction, Acceleration, Jerk, Steps): Fine slicer tweaks polish the outcome. Retraction distance and speed stop oozing during travel moves: 1–2 mm on direct‑drive, 4–6 mm on Bowden. Over‑retraction can strip filament or clog the hotend. Acceleration and jerk govern corner sharpness and ringing; tame values shrink vibrations but lengthen print time. Step‑per‑mm calibration keeps extrusion honest. These knobs suit advanced users—beginners can leave them on default while learning.
• Profiles & Experiments: Most slicers ship with ready‑made profiles—“fine” PLA, “draft” ABS, and so on. Start there, change one variable at a time, and print calibration cubes, towers, or benches. Every new filament spool deserves its own test. Optimization never really ends: the more you print, the better you predict how each tweak plays out on your machine.
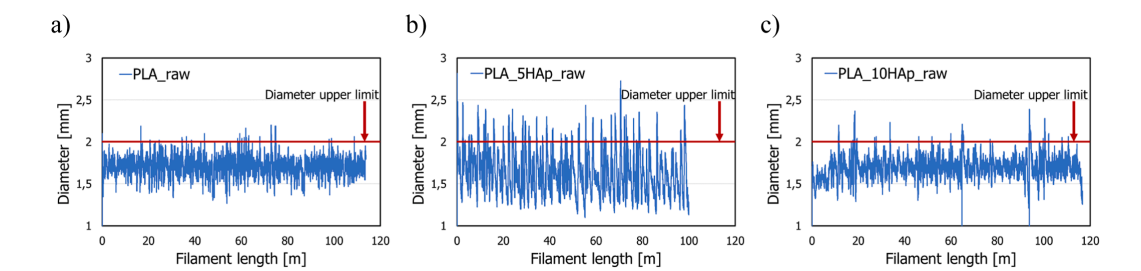
The study titled “Characterisation and manufacturing methods of material extrusion 3D printing composite filaments based on polylactide and nanohydroxyapatite,” published in issue 94 of Elsevier’s Additive Manufacturing (2024, article no. 104514), was carried out by researchers in the Electronics Circuits Department and the Polymer Engineering and Technology Department at Wrocław University of Science and Technology (WUST) in Poland.
In this work, the team blended standard PLA filament with 0%, 5%, and 10% nanohydroxyapatite (nHAp), using a simple real-time monitoring system (R-FQM) to track diameter inconsistencies and a multi-stage solid-state extrusion (SSE) method. Thanks to these practical adjustments and additional processing steps, hobbyists and small-scale workshop users can now tame the ±0.3 mm diameter fluctuations they’d normally see, dialing them down to around ±0.01 mm.
Material characterization tests—SEM, FTIR, TGA, and DSC—showed that low filler levels (around 5%) maintained thermal stability and preserved structural integrity, whereas higher dosages (10%) led to crack formation and a noticeable drop in mechanical performance. These findings serve as a handy guide for novice engineers and hobbyists on which filler percentage strikes the right balance of stiffness and toughness.
References
- International Organization for Standardization. (n.d.). ISO. Retrieved May 4, 2025, from https://www.iso.org/
- PADT, Inc. (n.d.). PADT: Innovation and product development. https://www.padtinc.com
- NMD GmbH. (n.d.). NMD – Metal powders for additive manufacturing. Retrieved May 6, 2025, from https://nmd-metalpowders.de
- Wohlers Associates. (n.d.). Wohlers Associates – Additive manufacturing consulting and analysis. https://wohlersassociates.com
- 3DGence. (n.d.). 3DGence – Industrial 3D printers and solutions. Retrieved May 6, 2025, from https://3dgence.com
- Hubs. (n.d.). Hubs – Online manufacturing platform. from https://www.hubs.com
- PubMed Central. (n.d.). PubMed Central (PMC). Retrieved May 1, 2025, from https://pmc.ncbi.nlm.nih.gov
- Tronxy. (n.d.). Tronxy 3D printers and 3D printing solutions. https://www.tronxy.com
- niulis, J., Kryszak, B., Grzymajło, M., Dudzik, G., Abramski, K. M., & Szustakiewicz, K. (2024). Characterisation and manufacturing methods of material extrusion 3D printing composite filaments based on polylactide and nanohydroxyapatite. Additive Manufacturing, 94, Article 104514.